Archive
Features removed or no longer developed starting with Windows Server 2025
Windows Server 2025 is bringing new features and at the same time also removing some of the ones, we used to implement in our environment.
Features removed in Windows Server 2025
- IIS 6 Management Console (Web-Lgcy-Mgmt-Console)
- NTLMv1
- Wordpad
- SMTP Server
- Windows PowerShell 2.0 Engine
Features that are no longer under active development:
- Computer Browser
- Failover Clustering Cluster Sets
- L2TP and PPTP in RRAS (disabled by default, can still be enabled if necessary)
- Network Load Balancing (NLB)
- NTLM (LANMAN and NTLMv2)
- Remote Mailslots
- TLS 1.0 & TLS 1.1
- WebDAV Redirector service
- Windows Internal Database (WID)
- Windows Management Instrumentation Command line (WMIC)
- VBScript
- Windows Server Update Services (WSUS) (more info)
If we are using driver synchronization in WSUS, Microsoft announced deprecation of this feature a while ago. Currently this deprecation is planned for April 18th 2025 – drivers will be available on the Microsoft Update catalog, but we will not be able to import them into WSUS. For now WSUS deprecation does not impact existing capabilities or support for Microsoft Configuration Manager.
More information about this changes is available here.
Windows Server 2025 Security Baseline Preview
With Windows Server 2025 getting closer and closer to GA, Microsoft recently announced Windows Server 2025 Security Baseline Preview (beginning with build 26296 -> register as insider -> download).
With new security baseline for Windows Servers we got some major changes in security management:
- apply baselines for individual machines:
- PowerShell cmdlets (available in Microsoft.OSConfig)
- Windows Admin Center (WAC)
- apply and monitor baselines at-scale:
- Azure Policy and Azure Automanage Machine Configuration
The WAC, Azure Policy and Azure Automanage Machine Configuration experiences will be released soon to the Windows Insider Program and will only work with Windows Server 2025.
At the core of new security baseline is Microsoft.OSConfig PowerShell Desired State Configuration (DSC) module. (There is also Linux version with similar name and capabilities: Azure OSConfig.) Because we are going to be using DSC to apply security defaults, those settings that we want to enforce will be automatically protected from any drift (DSC also enables us to use declarative model for system configuration management – we define the end state and the DSC module knows how to get there.)
Current version (0.1.201) of Microsoft.OSConfig DSC module has four functions that we can use:
- Get-OSConfigMetadata
- Get-OSConfigDesiredConfiguration
- Remove-OSConfigDesiredConfiguration
- Set-OSConfigDesiredConfiguration
and three aliases (that we probably shouldn’t be using):
- osc-get
- osc-remove
- osc-set
To apply security defaults we get to choose from four baseline scenarios:
- AppControl
- Defender\Antivirus (48 settings)
- SecuredCore (3 settings -> UEFI MAT, Secure Boot, Signed Boot Chain)
- SecurityBaseline (329 settings -> Account and password policies, Credentials Protections, Protocol defaults, Security Policies and Security Options,…)
CSV files (report) with details for above scenarios are available on GitHub.
Peeking into SD subfolder of the current version of Microsoft.OSConfig DSC module reveals few more details about the supported scenarios:
- AppControl
- AppControl_AzureStackHCI_DefaultPolicy_Audit
- AppControl_AzureStackHCI_DefaultPolicy_Enforce
- AppControl_WS2025_AppBlockList_Audit
- AppControl_WS2025_AppBlockList_Enforce
- AppControl_WS2025_DefaultPolicy_Audit
- AppControl_WS2025_DefaultPolicy_Enforce
- Defender_Antivirus
- SecuredCore
- SecuredCoreState
- SecurityBaseline_AzureStackHCI
- SecurityBaseline_AzureWindowsBaseline
- SecurityBaseline_WS2025_DomainController
- SecurityBaseline_WS2025_MemberServer
- SecurityBaseline_WS2025_WorkgroupMember
After we install the prerequisites:Install-PackageProvider NuGet, PowerShellGet -Force
we can install OSConfig module:Install-Module -Name Microsoft.OSConfig -AllowPrerelease -Scope AllUsers -Repository PSGallery -Force
Get-Module -ListAvailable -Name Microsoft.OSConfig
To apply the Security Baseline via PowerShell cmdlets we have to run Set-OSConfigDesiredConfiguration (to apply new configuration, we have to restart the device):
- On domain-joined device:
Set-OSConfigDesiredConfiguration -Scenario SecurityBaseline\WS2025\MemberServer -Default - On workgroup device:
Set-OSConfigDesiredConfiguration -Scenario SecurityBaseline\WS2025\WorkgroupMember -Default - On domain controller device:
Set-OSConfigDesiredConfiguration -Scenario SecurityBaseline/WS2025/DomainController -Default - For Secured-core configuration:
Set-OSConfigDesiredConfiguration -Scenario SecuredCore -Default - For Defender Antivirus configuration:
Set-OSConfigDesiredConfiguration -Scenario Defender\Antivirus -Default
Set-OSConfigDesiredConfiguration cmdlet includes few additional nice-to-have parameters that we can use when we apply security baseline:
- Setting & Value -> custom value for specific setting
- Setting & Default -> use the default value of the setting
- Version -> apply specific version (current module has one version per scenario)
If we want to customize specific setting in the basline, we can run:Set-OSConfigDesiredConfiguration -Scenario SecurityBaseline\WS2025\MemberServer -Name AuditDetailedFileShare -Value 3
orSet-OSConfigDesiredConfiguration -Scenario SecurityBaseline\WS2025\MemberServer -Name RemoteDesktopServicesDoNotAllowDriveRedirection -Value 0
Verify custom setting:Get-OSConfigDesiredConfiguration -Scenario SecurityBaseline\WS2025\MemberServer -Name AuditDetailedFileShare
orGet-OSConfigDesiredConfiguration -Scenario SecurityBaseline\WS2025\MemberServer -Name RemoteDesktopServicesDoNotAllowDriveRedirection
To view the compliance of the applied Security Baseline we can use:Get-OSConfigDesiredConfiguration -Scenario SecuredCoreState
More info including impact and some known issues are available in the official anouncement.
Windows Server 2025 – Hotpatching and WSUS
Windows Server 2025 GA is around the corner and with it more and more features are getting finalized. To keep up with the latest we should also check the list of features removed or no longer developed starting with Windows Server 2025.
Just few days ago Microsoft announced they are planning the deprecation of Windows Server Update Services (WSUS). For now, they are going to preserve the current WSUS functionality (in Windows Server 2025) and they will also continue to publish existing and new updates through the WSUS channel.
Due to more mobile workforce and probably also due to general cloud adoption, more and more of the updating services are moving to the cloud. For client patching, Windows Autopatch has been available for a while now and it alows us to automate Windows, Microsoft 365 Apps for enterprise, Microsoft Edge, and Microsoft Teams updates from the cloud (requires Intune and Entra ID joined devices). It does require one of the cloud subscriptions for the devices but in combination with Delivery Optimization it can bring us some nice bandwidth optimizations (probably one of the core reasons for typical WSUS deployment). We can even monitor DO usage for free in Azure Monitor or directly on the device with native PowerShell commands (Get-DeliveryOptimizationStatus, Enable-DeliveryOptimizationVerboseLogs,…). If we want to get more detailed DO usage report from the same data, we can also look at a free solution like this one (based on Power BI template). To go even deeper with DO analysis, we can follow along this nice Deep Dive guide (including setup in Configuration Manager) including detailed configuration guide.
Windows Autopatch is used for client update management. If we want to manage server updates from the cloud, we do have Azure hosted solution for that – Azure Update Manager. In combination with Windows Server Hotpatch we can get some nice update management capabilities and patching optimizations that we can use with our server infrastructure.
We can use Azure Update Manager (AUM) to us help manage and govern updates for all our machines (Windows and Linux servers) in Azure, on-premises, and on other cloud platforms from a single dashboard. Some of the nice to have features of AUM are: on-demand check for updates and/or deploy security and critical updates, enable periodic assessment to check for updates, customer-defined maintenance schedules, hotpatching,… Azure Update Manager pricing page tells us that we pay per day when server is connected to Arc and managed by Azure Update Manager.
Windows Server Hotpatch has been around for a while now but it had some major limits – probably the biggest one being that it only worked on Windows Server Datacenter: Azure Edition virtual machines either on Azure or Azure Stack HCI platform. The big thing that we get with hotpatching is a monthly Windows Server update without a required reboot at the end. It works by patching the in-memory code of running processes without the need to restart the process. Just recently hotpatching got an improvement – now it works on any Azure Arc-enabled Windows Sever 2025 Datacenter and Standard.
If we look at the Azure Arc pricing, we can see that we get some of the options for free (inventory, remote management with Windows Admin Cener (WAC) including remote RDP, SSH and PowerShell,…) as soon as the agent gets connected to our Azure subscription. Some of the Azure services that can be enabled as an add-on to Azure Arc: Azure Update Manager, Azure Policy guest configuration, Azure Monitor, Microsoft Defender for Cloud etc.
If we want to test all this features before we have to deploy them in our production environments, we can use evaluation versions of the required products:
- Windows Server 2025 Preview (download)
- Windows 11 Enterprise (download)
- Microsoft 365 Business Premium Trial (comes with Entra ID P1, Intune P1,…; more info)
- Azure free account (200 USD credit)
NTK 2019 and other Microsoft-related news
From 21. until 23. of May 2019, Portorož (Slovenia) became my home for few days. The reason for this was NTK (NT konferenca) – Microsoft’s IT conference that brought together people from all over the place.
During the three days conference was going on, I had a privilege to present three sessions of my own. As always, I was pleasantly surprised by the number of people who came to my sessions, even though the session was in the middle of the lunch time or the last one for the day. Thank you all for showing up and asking questions.
My sessions at NTK 2019 were:
- Povečanje varnosti Windows klientov – ways to improve Windows security
- Vzdrževanje SCCM in WSUS okolja – SCCM and WSUS maintenance
- Brezplačna orodja za upravljanje Windows okolij – free tools to speedup Windows maintenance
Presentations and demo files can be downloaded from NTK web site or from my OneDrive:
- Povečanje varnosti Windows klientov.pptx, Day1-Demos.zip
- Vzdrževanje SCCM in WSUS okolja.pptx, Day2-Demos.txt
- Brezplačna orodja za upravljanje Windows okolij.pptx
For all the demos on day one and day two I used Start-Demo.ps1 PowerShell script. Thank you Jeffrey Snover and Joel “Jaykul” Bennett for the original script.
During one of my presentations there was one Windows Sandbox related question – data sharing between Host and Sandbox. At the time I wasn’t aware of Windows Sandbox – Config Files which I believe is exactly where the question was going. There is MappedFolders parameter, that gives us an option to map local drive into Sandbox on user’s Desktop. Mapped folder can be Read-Only or Read&Write. Example of Windows Sandbox Config file with few additional options: WindowsSandbox.wsb
While we were busy with NTK, Microsoft rolled out few new products, services and announcements:
- Windows 10 1903 (available on VL Service Center since 21st of May, on MSDN since 4th of April)
- Microsoft Security Compliance Toolkit 1.0 updated with final version of Windows 10 Version 1903 and Windows Server Version 1903 Security Baseline (more info)
- AaronLocker updated (info)
- Features in Configuration Manager technical preview version 1905 (Application groups, BitLocker management, Task sequence debugger,…)
- Microsoft Edge preview builds – Chromium-based (Beta, Dev and Canary)
- Application Guard for Chrome und Firefox
On-premises BitLocker management using System Center Configuration Manager
Beginning in June 2019, System Center Configuration Manager (SCCM) will release a product preview for BitLocker management capabilities, followed by general availability later in 2019.
Configuration Manager will support BitLocker for Windows 10 Pro, Windows 10 Enterprise, and Windows 10 Education editions. It will also support Windows 7, Windows 8, and Windows 8.1 during their respective support lifecycles.
SCCM will provide the following BitLocker management capabilities:
Provisioning
Our provisioning solution will ensure that BitLocker will be a seamless experience within the SCCM console while also retaining the breadth of MBAM.
Prepare Trusted Platform Module (TPM)
Admins can open the TPM management console for TPM versions 1.2 and 2.0. Additionally, SCCM will support TPM+PIN for log in. For those devices without a TPM, we also permit USBs to be used as authenticators on boot.
Setting BitLocker Configuration
All MBAM configuration specific values that you set will be available through the SCCM console, including: choose drive encryption and cipher strength, configure user exemption policy, fixed data drive encryption settings, and more.
Encryption
Encryption allows admins to determine the algorithms with which to encrypt the device, the disks that are targeted for encryption, and the baselines users must provide in order to gain access to the disks.
Policy enactment / remediation on device
Admins can force users to get compliant with new security policies before being able to access the device.
New user can set a pin / password on TPM & non-TPM devices
Admins can customize their organization’s security profile on a per device basis.
Auto unlock
Policies to specify whether to unlock only an OS drive, or all attached drives, when a user unlocks the OS drive.
Helpdesk portal with auditing
A helpdesk portal allows other personas in the organization outside of the SCCM admin to provide help with key recovery, including key rotation and other MBAM-related support cases that may arise.
Key rotation
Key rotation allows admins to use a single-use key for unlocking a BitLocker encrypted device. Once this key is used, a new key will be generated for the device and stored securely on-premises.
Compliance reporting
SCCM reporting will include all reports currently found on MBAM in the SCCM console. This includes key details like encryption status per volume, per device, the primary user of the device, compliance status, reasons for non-compliance, etc.
If you are familiar with Microsoft BitLocker Administration and Monitoring (MBAM), you probably noticed that above listed BitLocker-related SCCM improvements to come look a lot like MBAM features – and you would be correct to think that. The reason for that is in Microsoft’s announcement for the MBAM support – MBAM will end mainstream support on July 9, 2019 and will enter extended support until July 9, 2024.
Regardless of the MBAM situation, I sure am happy to see this new feature set is coming to SCCM.
More info at: Microsoft expands BitLocker management capabilities for the enterprise
Pass the Hash and LAPS
Pass the Hash and LAPS are in a way like Yin and Yang, just without giving rise to each other as they interrelate to one another.
Quick how-to on how they work or don’t work together was recently published by Paula J. in here new blog post: Pass The Hash Attack Tutorial.
While on the subject of LAPS – not long ago Jiri Formacek published blog post regarding the impact LAPS implementation has on AD (replication, NTDS.dit size, network bandwidth and GPO size). For all of you interested in knowing more about inner workings of LAPS, check LAPS and AD sizing considerations.
Decrypting SID-protected PFX Files Without Having a Password
Recently I started following new blog available at CQURE Academy. Since it’s part of CQURE, I guess most of blog posts will be security related. So far most of the content was contributed by Paula Januszkiewicz. For those of you who haven’t heard her name before, you can check her bio at Paula Januszkiewicz.
Her latest blog is “Decrypting SID-protected PFX Files Without Having a Password“.
If you work with Active Directory and Certificate Services or just simply use PFX files and you want to know more about the implementation of SID-protected PFX files in recent versions of Windows, than this is definitely a must read for you.
One simple tip she points out is how to retrieve password of SID-protected PFX file if you are on the “allow list” (there is always a random password being used and it can be seen during the PFX import phase). You can save this password in your secure password database and use it “in case of…”.
More importantly, she is demonstrating how to inspect SID-protected PFX files and how to decrypt them without being on the “allow list”.
To demonstrate this, she is using two tools, created by CQURE:
– CQMasterKeyAD (retrieve master key from AD)
– CQDPAPINGPFXDecrypter (get decrypted password from PFX with known master key)
For the inspection of the PFX file she uses ASN.1 Editor, written by Vadims Podāns (author of the PowerShell PKI Module).
She plans to show more details about this at Microsoft Ignite. If you’ll be there, be sure to attend her sessions. For those of us, not so lucky, we’ll have to wait for session recordings at Channel 9.
Security Compliance Manager 4.0
On the 28th of July 2016 Microsoft released new version of Security Compliance Manager. You can find some basic info about new version here: Security Compliance Manager 4.0 now available for download!
For those of you who haven’t heard about this solution before, it’s a free tool that enables you to quickly configure computers in your environment using Group Policy and/or Microsoft System Center Configuration Manager. New installer currently includes the same set of baselines as its previous version (3.0.60 released on 22nd of January 2013). All baselines include supporting documentation and referenced set of best-practice GPO settings for:
– Exchange 2007 SP3 & Exchange 2010 SP2
– Internet Explorer 8, 9 & 10
– Office 2007 SP2 & Office 2010 SP1
– Windows XP SP3, Windows Vista SP2, Windows 7 SP1, Windows 8
– Windows Server 2003 SP2, Windows Server 2008 SP2, Windows Server 2008 R2 SP1, Windows Server 2012
Main improvements are:
– Windows 10 and Windows Server 2016 support
– Support for existing Windows 10 version 1507, and Windows 10 version 1511 security baselines
– Support for upcoming Windows 10 version 1607, and Windows Server 2016
– Bug fixes for ‘Compare’ and ‘Simple View’ features in SCM
I guess they were a bit in a hurry since they missed few things in SCM version 4.0.00.1:
– File version of the new installer file is the same as it is on the previous version
– LocalGPO.wsf is gone
– no new baselines included
If you liked and used now deprecated LocalGPO.wsf, you can find new version of LocalGPO here: LGPO.exe – Local Group Policy Object Utility, v1.0.
If you have internet access on the computer where you installed SCM, SCM can and does automatically download new versions of baselines for:
– Internet Explorer 11 (Attachments)
– Windows 8.1 (Attachments)
– Windows 10 version 1511 (Attachments)
– Windows Server 2012 R2 (Attachments)
– Office 2013 (Attachments)
– SQL 2012 (Attachments)
If you wander where do all the links come from, you can check this link (SCM does this when checking for updates). It points to the latest version of RssFeed_BaselineUpdateV4dot0.xml. With some imagination and few lines of PowerShell syntax you can automate this process and auto-download new baselines without SCM or for offline use.
SCM on Download Center:
– Microsoft Security Compliance Manager 3.0.60
– Microsoft Security Compliance Manager 4.0.00.1
From AdmPwd to LAPS and now LAPS.E
How it all began…
Not many Windows admins heard about AdmPwd in the early 2012. I guess one of the reasons was, that we were all still trusting in the secure storage of passwords that were used as part of Group Policy Preferences (GPP) configuration. As probably many of you, I used GPP for setting and resetting passwords for local users on domain-joined Windows systems. Although not that often, I also used GPP for GPO-based management of Scheduled Tasks (which also supported usage of account names and passwords).
Until 2012 I believed that passwords used in GPP-based GPOs were safe since they were encrypted with AES-265. And then it happened – one day somebody decided to publish 32-byte AES key which was used for password encryption in GPP. Some time after that internet became full of tips and tricks on how to find and decrypt passwords stored in SYSVOL (like this one). More than two years later Microsoft released security update that blocked usage of passwords in the affected GPPs (Drive Maps, Local Users and Groups, Scheduled Tasks, Services, Data Sources).
Soon after Microsoft released security update, Microsoft PFE Tom Ausburne wrote blog post How To Automate Changing The Local Administrator Password. He explained part of the story and, more importantly, presented a solution for something a lot of admins were struggling with – how to manage local admin password in this new world without GPPs. The answer was AdmPwd.
AdmPwd
Until I read his blog post I didn’t really know much about AdmPwd – although the product and it’s code was already freely available on the internet for more than two years.
As it happens, around the same time as Tom published his blog post, I started working on a project that had high security requirements and one of them was automated management of local admin passwords. With few different options on the table, AdmPwd was chosen as the final solution for this particular requirement.
Some other tools and resources that were also used for securing this particular environment:
– Microsoft Enhanced Mitigation Experience Toolkit (EMET)
– Microsoft Security Compliance Manager (SCM) and it’s LocalGPO Tool (LGT)
– SANS SEC505 course scripts
As luck would have it, Jiri Formacek, developer of AdmPwd, also joined the same project. After few late evening beers and chats with him I got even more interested in AdmPwd. Although I wasn’t responsible for the implementation of AdmPwd, it got me intrigued and I started investing my “free” time into testing and learning about this new tool. I also added his website Local admin password management solution into my “good to know” collection.
LAPS and LAPS.E
With regular updates/improvements and published blog, AdmPwd started gaining wider audience and more acceptance in the enterprise environment. Approximately one year later, AdmPwd became Local Administrator Password Solution (LAPS) and MS made it part of it’s product portfolio (published in Microsoft Download Center and as MS Security Advisory 3062591).
Few months later in 2015, advanced version of LAPS was released – LAPS.E (also known as LAPS-E or LAPS/E). For the last few months, LAPS.E is at version 7.2.1.0 and is not yet included in MS product portfolio. Regardless of this, based on my experience, new LAPS.E is stable and working solution that is by now probably deployed in quite a few enterprise environments.
Important changes between versions
I won’t go deep into details about all the changes between different versions of this solution. If you want to know more about changes between versions and what they bring to the table, I would recommend you to start with reading Description at Local admin password management solution.
If you want to know all the details about the solution, please read technical specification document, available as part of documentation package of the version you are interested in.
What I’ll focus on are three different versions that you can currently download and start testing.
All versions:
– packaged as MSI installers
– default installation installs only client DLL (Client Side Group Policy Extension)
– dedicated installers for x86 and amd64
– GPO management with custom ADMX/ADML
– PowerShell module for management is AdmPwd.PS
– GUI for management
– require Windows 2003 SP1 and newer DCs
– require AD Schema extension
– require delegation of permissions on computer accounts
– supports only domain joined Windows clients
– support local and AD auditing
– client settings located in registry at HKLM\Software\Policies\Microsoft Services\AdmPwd
AdmPwd 5.2.0.0
– AdmPwd @GitHub
– x64 Installer
– x86 Installer
– supports Windows XP/2003 and above
– installation folder for CSE and client tools is %ProgramFiles%\AdmPwd
LAPS 6.2.0.0
– Documentation and Installers
– supports RODC (CSE and admin tools) – solution requires connection to a writable DC
– supports Windows Vista and above, and Windows Server 2003 and above
– updated GUI, PowerShell module and ADMX/ADML files
– same AD Schema as in previous versions
– installation folder for CSE and client tools is %ProgramFiles%\LAPS
AdmPwd.E 7.5.x.x
– AdmPwd.E @GitHub
– samples for development of custom AdmPwd.E support tools and client applications
– Sway-hosted solution overview
– updated AD Schema, GUI, PowerShell module and ADMX/AMDL files
– supports multi-forest deployment
– supports password encryption
– supports password history
– encryption key managed with GPO
– supports Windows XP/2003 and above (until v7.5.1.0; v7.5.2.0 removed support)
– new password decryption service – PDS (on DC or member server; multiple instances for HA)
– management with client tools is done through PDS and not directly on AD objects
– installation folder for CSE and client tools is %ProgramFiles%\AdmPwd
LAPS.Nano.DSC
– LAPS and Nano Server
– Testing LAPS for Nano Server with ws2016lab
– tested on TP5 of Nano server
– only works on Nano server
– instead of CSE it works as a Windows Service
– requires PowerShell DSC to configure settings in registry
– since version 7.5.1.0 client for Windows 2016 Nano server part of AdmPwd.E
Lessons learned
I started working with AdmPwd when it was at version 4.0.7.0. Since then it got quite far already but it’s still going to go further – and I’m going to follow :).
To ease your first or next step with this solution, I wanted to share few tips I learned along the way. To be honest, this is actually the reason why I wanted to write this post for quite some time. Well, this and some encouraging feedback after I posted my last two posts two weeks ago (after 4 years before that).
Clean install
- Please, do read technical documentation before you start. You can find some nice examples and a lot of explanation on the “how it works” side of things.
- Learn about the solution and test it in non-production environment first.
- Define permission model that supports your organization.
- Define password policy for local admin account.
- Run AD health check.
- Install and use PowerShell module to extend AD Schema (as member of Schema Admins; whoami /groups).
- If deploying PDS server, define location and HA requirements.
- Install and configure PDS server (port, firewall exception, custom service account).
- Delegate needed AD OU permissions.
- Copy ADMX & ADML to Policies, preferably in Central Store.
- Implement new GPO with needed configuration (easier for future upgrade).
- Install CSE on clients.
- Install GUI and/or PowerShell module on management computer.
Upgrade
- Schema update needed when upgrading to version 7 (versions 4, 5 and 6 share the same AD Schema extensions).
- New versions of management tools are backward compatible.
- Upgrade management tools and ADMX/ADML files.
- If you want to support multiple versions with different settings, use dedicated GPOs.
- Prepare new GPOs or set new policies in existing GPOs.
- Only one CSE version can be installed on any client at one time.
- Deploy new CSE to clients.
Custom install
– Different versions of PowerShell modules and GUI can be deployed on the same management computer in “portable mode” (without installation) as long as they are in different folders.
– Management tools can be stored and run from central location.
– To create “portable” versions of management tools, use admin install for MSI packages:
MSIEXEC /a “LAPS.x64.msi” /qn TARGETDIR=”AdmPwd.Setup.x64″
– To hide software in Programs and Features Control panel view, use msiexec parameter ARPSYSTEMCOMPONENT=1:
MSIEXEC /i “LAPS.x64.msi” /qn ARPSYSTEMCOMPONENT=1
– To create custom local admin account use msiexec with CUSTOMADMINNAME parameter:
MSIEXEC /i “LAPS.x64.msi” /qn CUSTOMADMINNAME=LocalAdmin
– To change default behavior of component installation (CSE only), you can either customize MSI with MST or use msiexec with ADDLOCAL parameter:
msiexec /i LAPS.x64.msi ADDLOCAL=CSE (this is default configuration)
msiexec /i LAPS.x64.msi /qn ADDLOCAL=CSE (silent install, no GUI, default configuration)
msiexec /i LAPS.x64.msi /qn ADDLOCAL=CSE,Management,Management.UI,Management.PS,Management.ADMX (silent install of CSE and all management tools)
msiexec /i LAPS.x64.msi /qn ADDLOCAL=Management,Management.UI,Management.PS,Management.ADMX REMOVE=CSE
or
msiexec /i LAPS.x64.msi /qn ADDLOCAL=Management.UI,Management.PS,Management.ADMX REMOVE=CSE (silent install of all management tools, remove CSE)
msiexec /i LAPS.x64.msi /qn ADDLOCAL=CSE,Service (silent install of PDS and CSE)
msiexec /i LAPS.x64.msi /qn ADDLOCAL=Management (silent install, prestage only – no component gets installed) GUI-based selection would be like this:
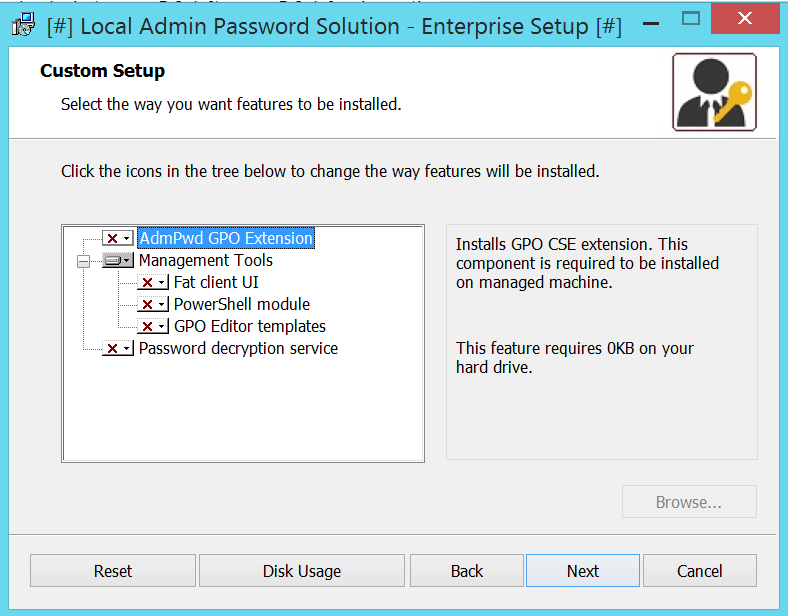
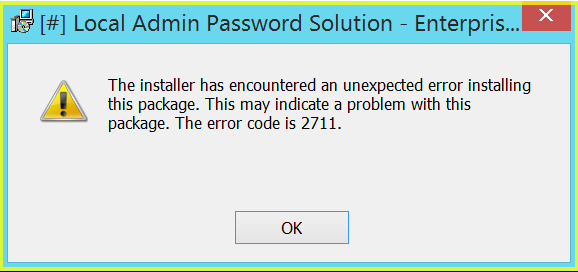
If you want to check which components are available for ADDLOCAL parameter, use Orca, SuperOrca or any other MSI database table editor and view table Feature. Be aware, that this parameter is case sensitive. If you miss-type something, you’ll get error code 2711 during installation:
Components, supported with LAPS 7 installer:
– CSE
– Management.UI
– Management.PS
– Management.ADMX
– Service
If you want to learn more about MSIEXEC and supported parameters check:
– Command-Line Options
– How to Use Property Reference Command-Line Parameters with Msiexec.exe
Despite the unusually long post, I hope you managed to get something useful out of if. If nothing else, it’s a nice reference for future reading – another reason why I wanted to write about it.
Stay tuned for the next one…
* links updated on 10th of April, 2017 to include GitHub sources
