Archive
How to install and/or update Windows Admin Center extensions in offline/disconnected environment?
I often work with disconnected systems where WAC is successfully deployed and rarely or never updated. One update that is not easy to do with offline WAC installation is pushing update for all the installed extensions.
If our WAC gateway server doesn’t have internet connectivity, we can go to WAC feed for extensions (v1) on any internet connected device and manually download extensions we want to install and/or update in our WAC deployment. To complicate this process further, we can browse through few more feeds to find all relevant extension packages: public (v1), WAC-public (v2),…
Instead of manually finding the right/latest version of extensions for our WAC version (v1 and/or v2), we can use PowerShell to speed things up… In my WAC repository we can find two scripts that will do most of the work for us:
Both scripts connect to the relevant WAC extension feed, ask for the download location (folder) and automatically download all latest versions of compatible extensions.
After we have this extension repository in locally, we need to transfer it somewhere in our disconnected environment. Usually I store it locally on WAC server (no extra delegation/sharing needed), but it can as well be somewhere on our network. If we plan to use network share on remote server, we need to remember that WAC service by default runs as “Network Service” and we must allow read access for WAC gateway computer object:

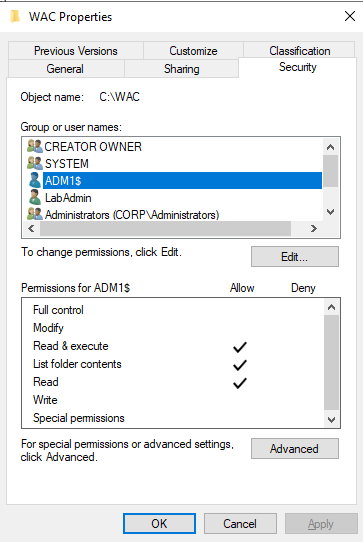
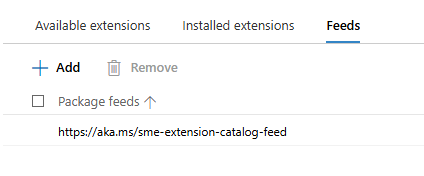
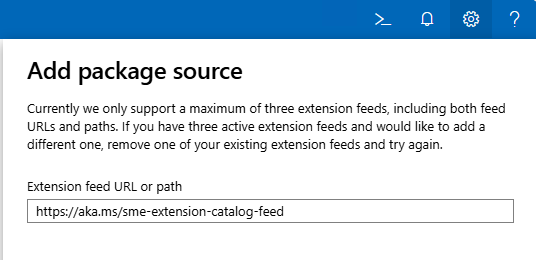
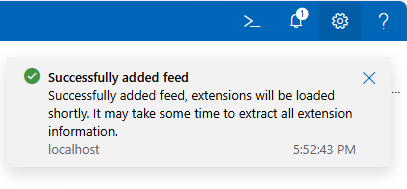
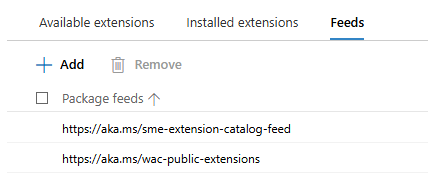
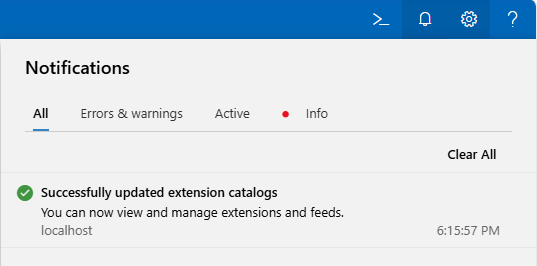
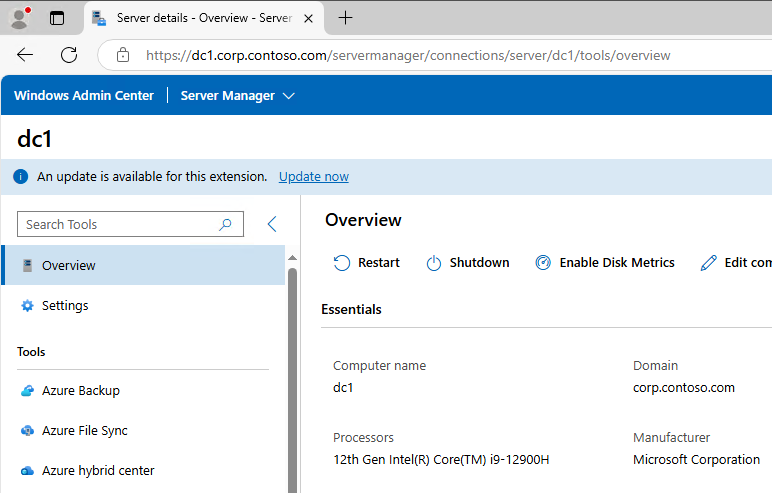
After we have folder with extension packages in place locally or on remote server, we need to update WAC extensions feeds:

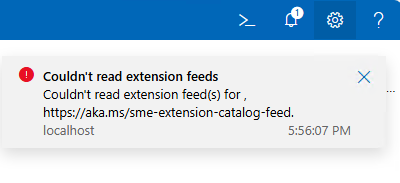
In the above picture ADM1 is WAC gateway and DC1 is used as remote share.
One thing to remember – currently WAC supports a maximum of three extension feeds.
If we enable auto-update, extensions will automatically update from our local source as well. If not, well than it’s up to us…

If we want to enable support for both V1 and V2 extensions in WACv2, we can check one of my previous posts on this exact topic (hint: it’s because of Configuration Manager extension).
Until next time…
Enable support for Configuration Manager extensions in Windows Admin Center v2
Windows Admin Center (WAC) v1 (2311, MSI,…) has it’s own extension feed (https://aka.ms/sme-extension-feed):
With this older version of WAC we are able to extend WAC functionality with support for Configuration Manager Client and Configuration Manager Client Tools. New WAC (WAC v2) is using different extension feed and as of mid-February 2026 this feed doesn’t have Configuration Manager extension.
WAC v1 – default extensions:
Apps & features
Azure Backup
Azure File Sync
Azure hybrid center
Azure Kubernetes Service
Certificates
Cluster Creation
Cluster Manager
Developer Guide
Devices
Diagnostics
Events
Failover cluster tools
Files & file sharing
Firewall
GPUs
Hardware Manager for Azure Stack HCI (Microsoft Hardware Only)
Local users & groups
Microsoft Defender for Cloud
Network ATC
Network Controller tools and SDN Virtual networks
Networks
Packet monitoring
Performance Monitor
PowerShell
Processes
Registry
Remote Desktop
Remote Support
Roles & features
Scheduled tasks
SDN Gateway connections
SDN infrastructure
SDN Load balancers
SDN Logical networks
SDN Network security groups
SDN Route tables
Security
Server Manager and Computer Management
Services
Storage
Storage Migration Service
Storage Replica
System Insights
Updates
WAC v1 – available extensions:
Active Directory
Advantech IPMI Management (Preview)
Azure Cloud Shell (Preview)
Azure Extended Network
BiitOps Changes
BiitOps Inventory
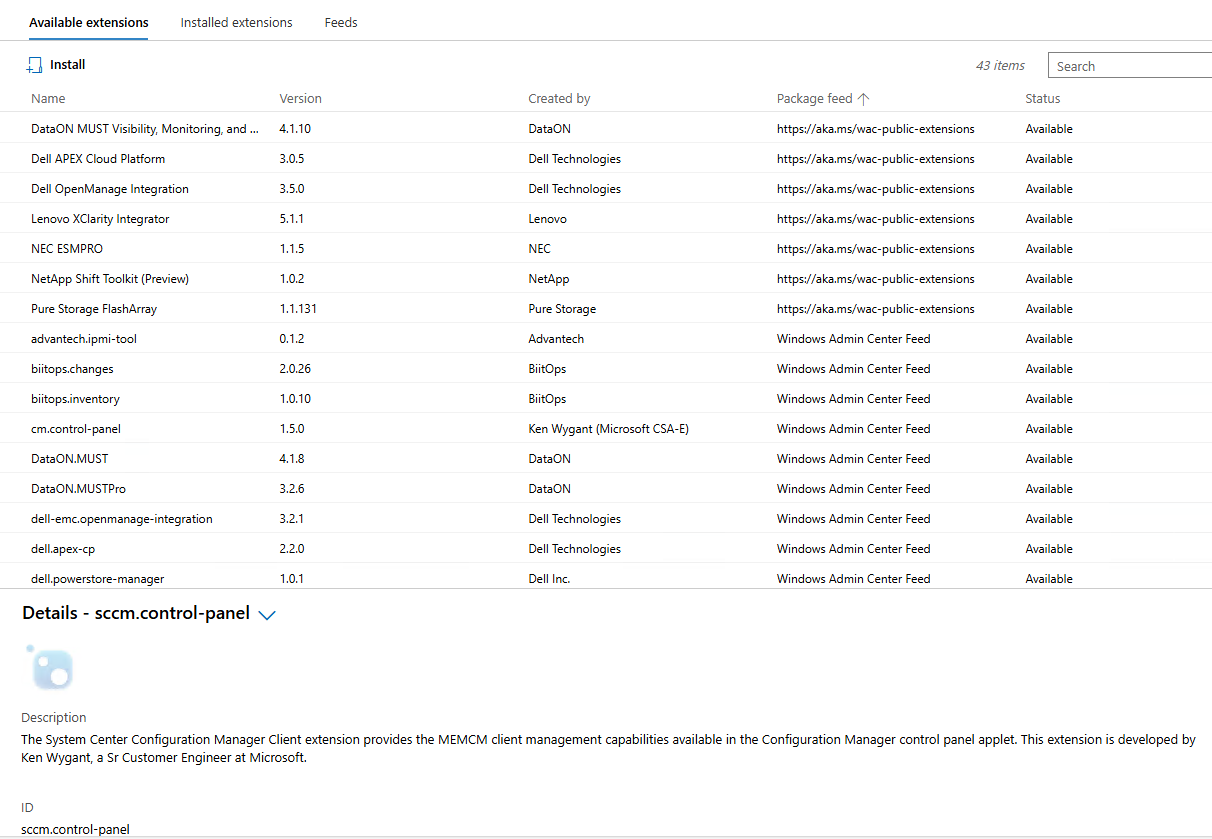
Configuration Manager Client (Preview)
Configuration Manager Client Tools (Preview)
Containers
DataON MUST Pro
DataON MUST Visibility, Monitoring, and Management Tool
Dell APEX Cloud Platform
Dell OpenManage Integration
Dell PowerPath
Dell PowerStore Manager
DHCP (Preview)
DNS
Fujitsu ServerView® Health
Fujitsu ServerView® RAID
FUJITSU Software Infrastructure Manager
HPE Azure Stack HCI Cluster Deployment and Update Snap-In
HPE OneView WAC Extension
HPE Server and Azure Stack HCI WAC Extensions
HPE Storage
Intel® Server Debug and Provisioning Tool
Lenovo XClarity Integrator
Marvell QLogic Fibre Channel QConvergeConsole Extension
msft.iis.iis-management
NEC ESMPRO
Pure Storage FlashArray
QCT Management Suite
SDN Public IP addresses (Preview)
secureguard blazics Updates
Security (Preview)
Thomas-Krenn.AG | Driver & Firmware Updates
Thomas-Krenn.AG | S2D Micro-Cluster
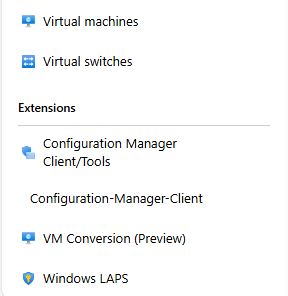
WAC v2 – default extensions:
Apps & features
Azure Backup
Azure File Sync
Azure hybrid center
Certificates
Cluster Creation
Cluster Manager
Developer Guide
Devices
Events
Failover cluster tools
Files & file sharing
Firewall
Local users & groups
Network ATC
Network Controller tools and SDN Virtual networks
Networks
Packet monitoring
Performance Monitor
PowerShell
Processes
Registry
Remote Desktop
Roles & features
Scheduled tasks
SDN Gateway connections
SDN infrastructure
SDN Load balancers
SDN Logical networks
SDN Network security groups
SDN Route tables
Security
Server Manager and Computer Management
Services
Storage
Storage Migration Service
Storage Replica
System Insights
Updates
Virtual machines and switches
Windows LAPS
WAC v2 – available extensions:
Active Directory
Azure Kubernetes Service
Containers
DataON MUST Visibility, Monitoring, and Management Tool
Dell APEX Cloud Platform
Dell OpenManage Integration
DHCP
DNS
GPUs
Lenovo XClarity Integrator
NEC ESMPRO
NetApp Shift Toolkit (Preview)
Pure Storage FlashArray
VM Conversion (Preview)
What happens if we add WAC v1 extension feed to WAC v2?
Hm, it gets successfully added…
But, does it actually work? Well, no…
To get support for old extension feed in WAC v2, we are still missing one key configuration change:
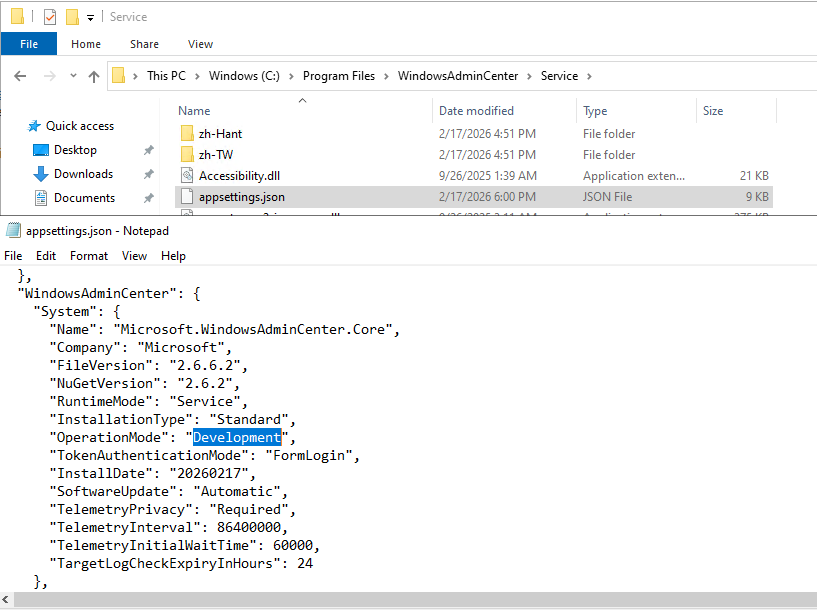
We need to change WAC “operation mode” from “Production” to “Development”. And because this is WAC service configuration file we just changed, we must restart WAC service (Restart-Service -Name WindowsAdminCenter) before we can see this change applied to our WAC portal:
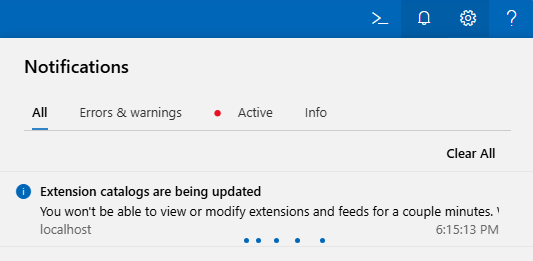
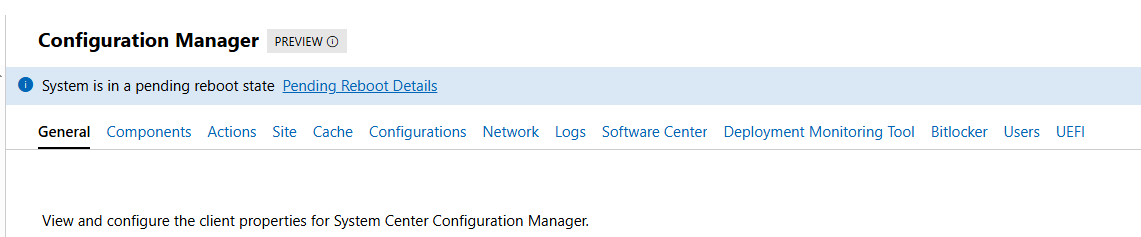
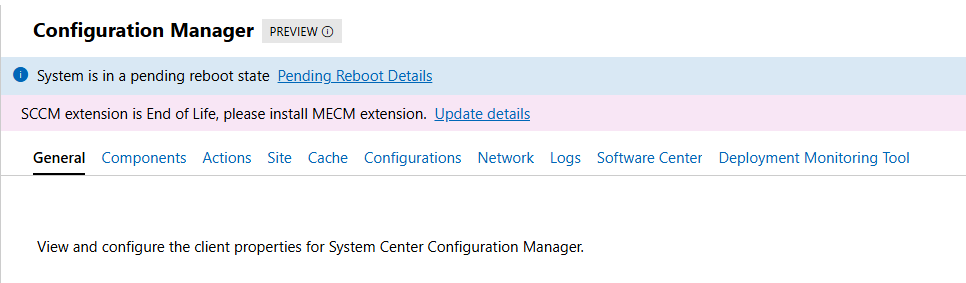
If all goes well, we can now see all “old WAC v1” extensions, including the two for the Configuration Manager Clients:
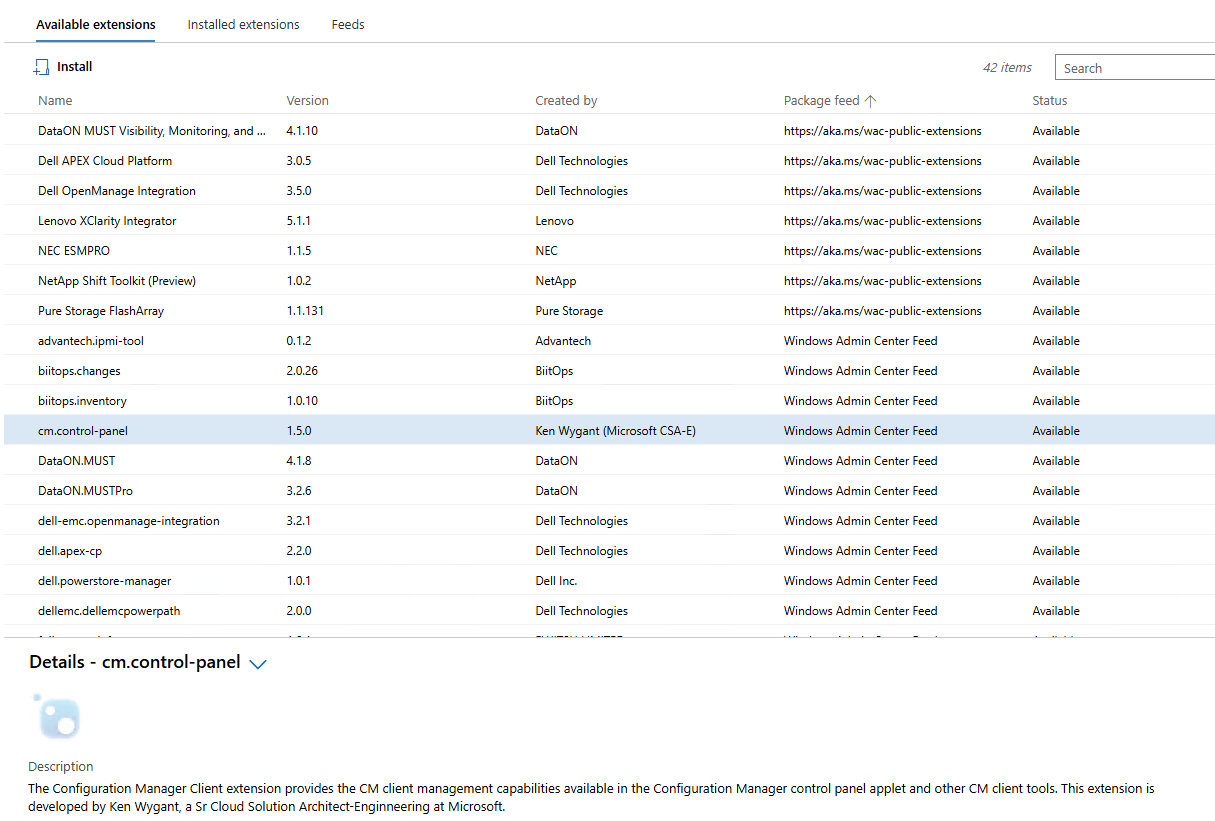
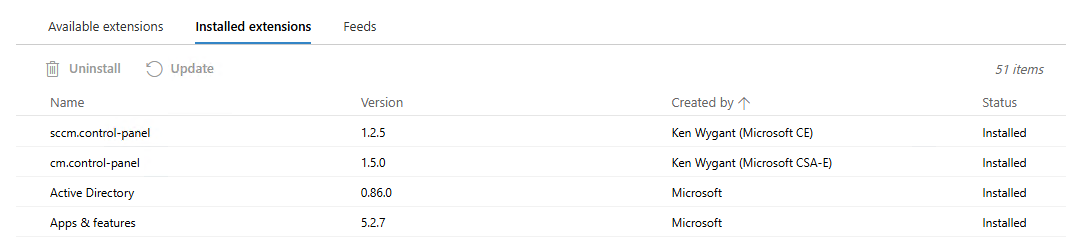
CM extensions installed side-by-side with new extensions on WAC v2:
Until we meet again…
25th Sinergija conference in Belgrade, Serbia
During the last week of November 2025 I attended Sinergija, Southeast Europe’s premier business and technology conference. This year Sinergija had already it’s 25th anniversary and was running on November 26-27 at Belgrade’s SAVA CENTAR. The event, themed “Let’s AI!”, focused on artificial intelligence, cloud technologies, and digital transformation.
It was my pleasure to be chosen as one of the speakers. Although my presentation was in the last time slot on day two, I still had a nice big group joining me. I was presenting one of the few infrastructure related topics: Advanced usage of Azure Virtual Desktop.
If you are interested in what I was talking about, you can find my slides below.
Big thank you to the Sinergija team, speakers, partners and all the attendees that joined to make this conference a success.
30th NT CONFERENCE in Portorož, Slovenia
From 22nd until 24th of September there was a business and technology conference in Slovenia. It had a lot of great presenters sharing their experience, technical knowledge and views in many different topics. I imagine anybody that wanted to was able to find something interesting to go and learn about. Topics covered were raging from Linux to Windows, from security to development, from on-prem to the cloud, from AI and far beyond.
It was my pleasure to be chosen as one of the speakers on the 30th anniversary of the NT conference. This year I submitted three presentations and all there were confirmed for delivery:
- Je Azure Arc res lahko brezplačen? (When/how can Azure Arc be free?)
- Napredna uporaba Azure Virtual Desktop okolij (Advanced usage of Azure Virtual Desktop)
- Azure Virtual Desktop vs Windows 365
If you want to learn more about the topics covered at the conference, you can head to the https://www.ntk.si/.
If you are interested in what I was talking about, you can find my slides below.
Hope to see you next year at the 31st NT conference.

Deep dive into Windows Admin Center v2 (WACv2) installation
Few months after my last blog post on the subject of WAC, Microsoft released updated preview version of their next Windows Admin Center v2 (announcement with detailed info). That version changed some of the problematic behavior of first preview installer (for the better) and introduced new checks and steps that broke some of the scenarios from before. Later, towards the end of the year 2024, Microsoft released stable, production ready version of WACv2 – version 2410 (file name) or 2.4.0.0 (version in Control Panel and WindowsAdminCenter.exe).
Since this new version brought few nice and welcome changes, I decided to write an update to the original blog post. We will also check if and how we can get it running on DC (NOT supported or recommended for production).
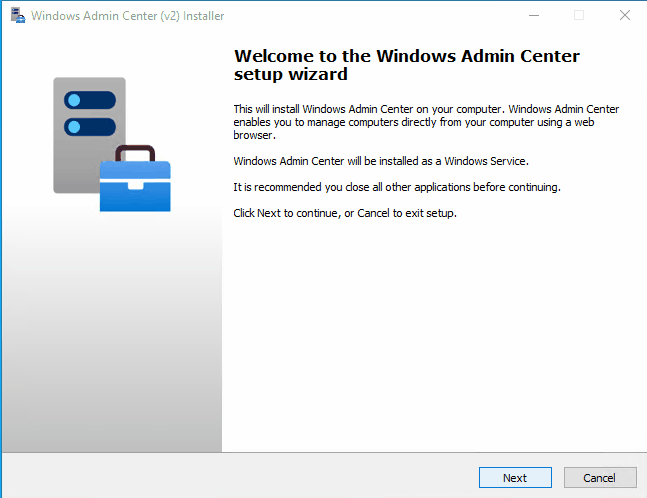
Installation
Before we start with the installation of WACv2, we should check list of known issues and troubleshooting steps – just to avoid any unnecessary troubleshooting (been there, done that…).
If we want to start the installation, we need the installer files… As it was with previous version, we can find the latest version of WAC on Microsoft Evaluation Center: Windows Admin Center (download, direct download). If we want to work specifically with version 2410, we can find direct link for that version. (FYI. As of this writing, since WACv2 version 2410, Insider preview version is not the latest version of WAC anymore.)
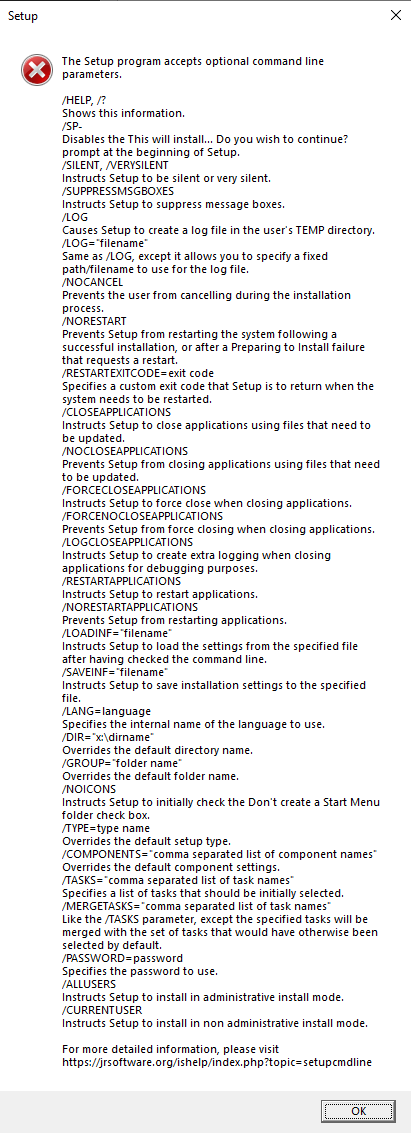
All preview versions of WACv2 installers including now GA version 2410 of WACv2 were built with Inno Setup:

If we want to, we can customize some of the setup experience (silent, verysilent, log, saveinf, loadinf,…) with Inno Setup command line parameters (more info here):
install_script.iss
If we want to see what’s hiding inside the installer, we can use tools like innoextract or UniExtract2 to get out all or some of the files. When I prefer to use GUI tools, I like InnoUnpacker – this one is nice because it’s usually able to extract setup instructions and save them in install_script.iss. And if we want to extract just the installer instructions, we can do just that as well:

Since the install_script.iss file contains almost 7000 rows, I won’t be adding it here… But we can find it for reference in my GitHub repo for WACv2: install_script.iss. What we can see inside is general info about the package and few other sections:
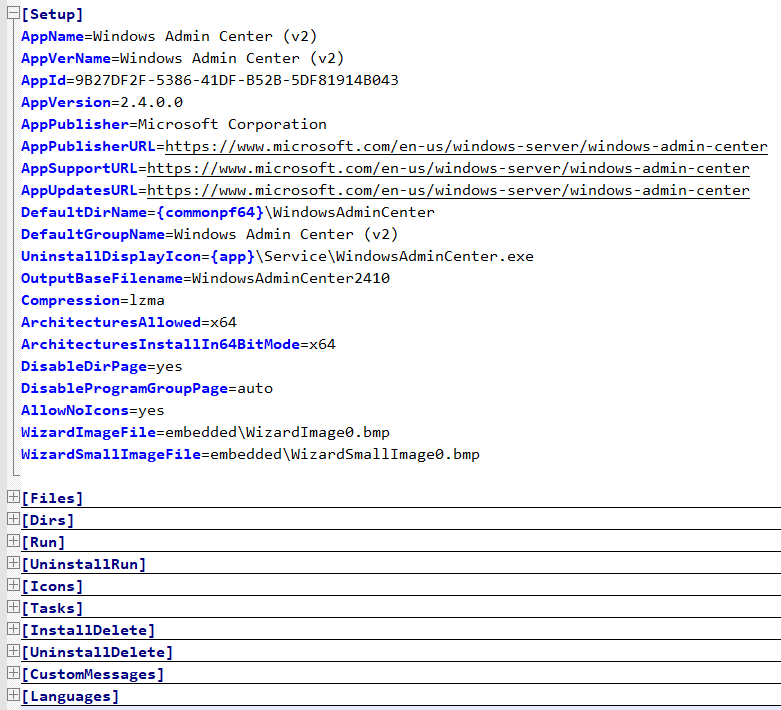
For the analysis and/or troubleshooting of the setup procedure the most interesting section is “Run“, since it gives us list of all the PowerShell commands (and their locations in order of execution) that are used during the installation of WACv2 (check below for more info).
With one exception, all of the cmdlets used during the installation are stored and loaded from one module: Microsoft.WindowsAdminCenter.Configuration. Only Update-WACEnvironment is loaded from Microsoft.WindowsAdminCenter.Migration.
Installer logs
During/after the installation of WACv2 we can find verbose installation log in user’s temp folder “%temp%\Setup Log yyyy-MM-dd #00x.txt” and summary log at “C:\ProgramData\WindowsAdminCenter\Logs\Configuration.log”. If something goes wrong during the installation, installer offers us to automatically open Configuration.log log file:
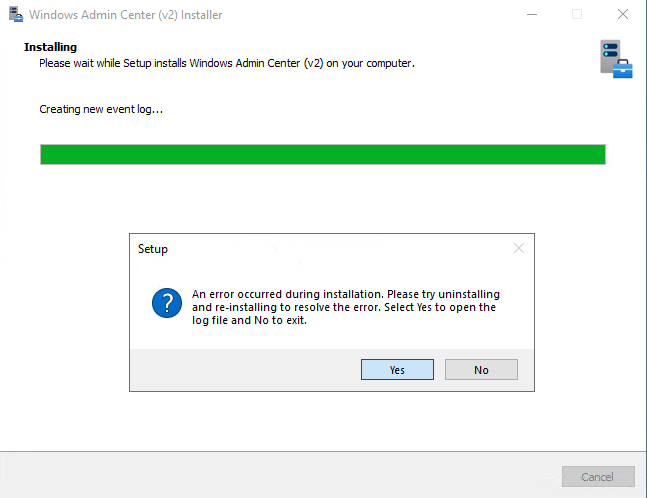
When we want to keep the installer log file, we should redirect it to custom location. We can do that with setup parameter: Start-Process "C:\WAC\WindowsAdminCenter2410.exe" -wait -ArgumentList "/log=C:\WAC\WWindowsAdminCenter2410.log"
If we do the supported installation (not on our domain controller), there shouldn’t be any errors. But if there are, now we know where to look for them.
Installer options
New installer gives us two modes of installation to choose from:

Express setup, as the name implies, is simplified version with most of the background cmdlets using the default values. If we want, we can run this mode silently, which means we can also run it remotely (probably… more info below):
# silent install locally - show progress
Start-Process "C:\WAC\WindowsAdminCenter2410.exe" -wait -ArgumentList "/log=C:\WAC\WWindowsAdminCenter2410.log /silent"

# silent install locally - no GUI
Start-Process "C:\WAC\WindowsAdminCenter2410.exe" -wait -ArgumentList "/log=C:\WAC\WWindowsAdminCenter2410.log /verysilent"
TLS certificate
In both Express and Custom modes, we can either use pre-installed TLS certificate or generate new self-signed certificate with 60 days validity:

If we have custom TLS certificate available (AD CS -> Web Server template), we need to specify Thumbprint of the certificate we want to use for WAC:
In this step we can notice one really nice improvement that was introduced in one of the last preview versions: Private Key Access Control is now AutoConfigured with Set-WACCertificateAcl cmdlet. What this means is when we want to use custom certificate, all we need to do during preparation phase is install the cert in local computer store (Cert:\LocalMachine\My\).
In the TLS certificate thumbprint step we should be able to select thumbprint of our certificate in the installer’s drop-down menu. If this drop-down doesn’t show our certificate thumbprint and we know it should be there, we can manually find certificate thumbprint like this: Get-ChildItem -Path Cert:\LocalMachine\My\and just paste in in the installer.
If for some reason auto configuration for ACLs doesn’t work, we can manually run the Set-WACCertificateAcl cmdlet. In this case we need Subject Name of the certificate:
Get-ChildItem -Path Cert:\LocalMachine\My\
Set-WACCertificateAcl -SubjectName CN=FS01.corp.contoso.com
All Set-WACCertificateAcl does, it adds one new ACL for NETWORK SERVICE with Full Control to the private key of the certificate (this is what installer does for us):

If we want to do the same manually (“the old way”) we can open: CertLM.msc -> Personal -> Certificates -> select certificate -> All Tasks -> Manage Private keys -> Add -> NETWORK SERVICE -> Full control.
Express setup – Windows Server
After we accept the Eula, select the installation mode and the type of certificate we want to use, there isn’t much else we can configure in express mode. We can select how do we want WAC to be updated and how much of the diagnostic data we want to send to Microsoft.
Express setup with self-signed TLS certificate on member server Windows Server 2022:

Express setup with pre-installed TLS certificate on member server Windows Server 2022:

# Express setup configuration with self-signed certificate (server OS)
Set-WACNetworkServiceAccess
New-Item C:\ProgramData\WindowsAdminCenter\Logs\Configuration.log -ItemType File -Force
Enable-WACPSRemoting
Remove-WACSelfSignedCertificate
New-WACSelfSignedCertificate -Fqdn FS01.corp.contoso.com
Set-WACEndpointFqdn -EndpointFqdn FS01.corp.contoso.com
Copy-WACTempUpdaterProcessFiles
Register-WACUpdaterScheduledTask
Register-WACService -Automatic
Set-WACInstallDate
Set-WACFileVersion -FileVersion 2.4.0.0
Set-WACNuGetVersion -NuGetVersion 2.4.0
Set-WACWinRmTrustedHosts -TrustAll
Set-WACWinRmOverHttps -Enable:$false
Set-WACSoftwareUpdateMode -Mode Automatic
Set-WACTelemetryPrivacy -Mode Required
Set-WACOperationMode -Mode Production
Set-WACLoginMode -Mode FormLogin
Set-WACCertificateSubjectName
Set-WACCertificateAcl
Set-WACHttpsPorts -WacPort 443 -ServicePortRangeStart 6601 -ServicePortRangeEnd 6610
Register-WACAccountManagementService
Register-WACFirewallRule -Port 443
Register-WACLocalCredSSP
Set-WACServiceSecurityDescriptor
Initialize-WACDatabase
Import-WACExistingExtensions
Import-WACExistingPlugins
New-WACEventLog
Remove-WACSetupStartMenuShortcut
Start-WACLauncher

# Express setup configuration with pre-installed certificate (server OS)
# ...
Set-WACCertificateSubjectName -Thumbprint 5...6
# ...
Express setup – Windows Client
Express setup on Windows Client OS has similar experience to server installation. Most of the configuration is the same as is on the server counterpart but there are few key differences:
- WAC service is by default listening on TCP port 6600, localhost only mode
- no automatic start for WAC service
- no inbound firewall rule for WAC on TCP port 6600
Default configuration for WindowsAdminCenter service on Windows client OS:

If we enable automatic start of WAC service and add one extra firewall rule for TCP 6600, we can now run WAC in fully functional gateway mode (on Windows Client 😊):
Express setup with self-signed TLS certificate on Windows 11 looks like this:

Express setup with pre-installed TLS certificate on Windows 11 looks like this:

# Express setup configuration with self-signed certificate (client OS)
Set-WACNetworkServiceAccess
New-Item C:\ProgramData\WindowsAdminCenter\Logs\Configuration.log -ItemType File -Force
Enable-WACPSRemoting
Remove-WACSelfSignedCertificate
New-WACSelfSignedCertificate -Fqdn CLIENT1.corp.contoso.com
Set-WACEndpointFqdn -EndpointFqdn CLIENT1.corp.contoso.com
Copy-WACTempUpdaterProcessFiles
Register-WACUpdaterScheduledTask
Register-WACService
Set-WACInstallDate
Set-WACFileVersion -FileVersion 2.4.0.0
Set-WACNuGetVersion -NuGetVersion 2.4.0
Set-WACWinRmTrustedHosts -TrustAll
Set-WACWinRmOverHttps -Enable:$false
Set-WACSoftwareUpdateMode -Mode Automatic
Set-WACTelemetryPrivacy -Mode Required
Set-WACOperationMode -Mode Production
Set-WACLoginMode -Mode FormLogin
Set-WACCertificateSubjectName
Set-WACCertificateAcl
Set-WACHttpsPorts -WacPort 6600 -ServicePortRangeStart 6601 -ServicePortRangeEnd 6610
Register-WACAccountManagementService
# N/A: Register-WACFirewallRule -Port 6600
Register-WACLocalCredSSP
Set-WACServiceSecurityDescriptor
Initialize-WACDatabase
Import-WACExistingExtensions
Import-WACExistingPlugins
New-WACEventLog
Remove-WACSetupStartMenuShortcut
Start-WACLauncher

# Express setup configuration with pre-installed certificate (client OS)
# ...
Set-WACCertificateSubjectName -Thumbprint 4...D
# ...
Express setup – remote
Because WACv2 installer forcefully enables PowerShell remoting with Enable-WACPSRemoting (it runs Enable-PSRemoting -Force), any and all remote PowerShell sessions are dropped at that time. If we use PowerShell remoting to try and install WACv2, this is where the installer fails, and we must continue with manual configuration (all the steps after Enable-WACPSRemoting).
Better option is to avoid PowerShell remoting during the WACv2 installation (if already enabled, we can still use it for preparation, to create directory, copy installer files locally,..) and use something else for remote push install. I like to use Sysinternals PsExec:
# file must be already on remote computer
.\PsExec64.exe -accepteula \\$Computer -d -h -s  C:\WAC\WindowsAdminCenter2410.exe /log=C:\WAC\WWindowsAdminCenter2410.log /verysilent
# OR -> copy (overwrite) file and run the installer
.\PsExec64.exe -accepteula \\$Computer -d -h -s -c -f WindowsAdminCenter2410.exe /log=c:\Windows\Temp\WindowsAdminCenter2410.log /verysilent
.\PsExec64.exe -accepteula \\$Computer -d -h -s cmd /c del C:\Windows\WindowsAdminCenter2410.exe
Since the installer has different defaults based on the type of the operating system (check above) where it’s being installed (Server/Client), we need to be mindful about that… Luckily for us, if/when we need to, we can customize all of the defaults with few PowerShell cmdlets.
Custom setup
Custom setup has few more steps we can use to customize default configuration. Customization options for WACv2 installer in custom mode:
- Network access: Local host access only or Remote access
- Default on Server: Remote access.
- Default on Client: Localhost access only
- Login selection: HTML Form or Windows Authentication
- Default: HTML Form Login
- External HTTPS port
- Default on Server: 443
- Default on Client: 6600
- TLS Certificate: pre-installed TLS certificate or self-signed certificate
- Default: Use the pre-installed TLS certificate
- TLS Certificate thumbprint: drop-down with suitable certificates
- If empty, and proper cert is installed: manually paste the thumbprint
- FQDN: must match certificate selection
- Default: host FQDN
- Trusted Hosts: Any computer or only trusted domain computers
- Default: Allow access to any computer
- WinRM over HTTPS
- Default: WinRM over HTTP
- Automatic updates: automatically, notify or disable
- Default: Install updates automatically
- Send diagnostic data to Microsoft: Required or Required & Optional
- Default: Required diagnostic data
Custom setup with pre-installed certificate on member server Windows Server 2022:
Custom setup with pre-installed certificate on Windows 11:
In custom installation mode on Windows Client OS, we can customize WACv2 installer to deploy gateway mode with the same configuration that we saw on Windows Server OS. The installer configures both Windows Firewall with the relevant exception and WindowsAdminCenter service with Automatic startup. Job well done 😊.
End result of custom WACv2 installation on Windows 11 (fully functional gateway mode):
Custom setup – remote
Installers build with Inno setup can support automation of installer parameters by specifying custom INF file. We can generate this INF file with /SAVEINF parameter:
Start-Process "C:\WAC\WindowsAdminCenter2410.exe" -wait -ArgumentList "/log=C:\WAC\WindowsAdminCenter2410.log /SAVEINF=C:\WAC\WindowsAdminCenter2410.inf"Sadly, this does not work for custom parameters that are used in WindowsAdminCenter2410.exe installer (most of the installation wizard parameters are custom parameters). With INF config file we can only customize five install parameters. Defaults for WACv2 (WindowsAdminCenter2410.inf):
[Setup]
Lang=en
Dir=C:\Program Files\WindowsAdminCenter
Group=Windows Admin Center (v2)
NoIcons=0
Tasks=desktopshortcut
To automate custom installation of WACv2, we must run silent installer and do all the needed customization post-installation, with provided PowerShell functions (functions listed above (for default express installation) are sorted in order they are executed during the installation).
FYI. Custom parameters are supported with Inno setup installers and can be used if the author (developer) decides to implement them (as far as I can tell, this is not yet the case for WACv2 installer – maybe in next version of installer or WACv3,…).
PowerShell cmdlets we can use to manually customize WACv2
Below cmdlets are the same, as the installers is using during the installation. Listed below are just the ones we can use to customize something. Full list of installer executed cmdlets is available in the express install section.
New-WACSelfSignedCertificate #Param: Fqdn, Trust
# Trust: export self signed certificate and import it to the Trusted Root cert store
Set-WACEndpointFqdn #Param: EndpointFqdn, ServiceFqdn, NoHosts
# ServiceFqdn: default set to EndpointFqdn, if not update HOSTS
# NoHosts: used with ServiceFqdn not to write ServiceFqdn to HOSTS
Register-WACService #Param: Automatic
# Automatic: Start mode for the service; if not used, service starts On Demand
Set-WACWinRmTrustedHosts #Param: TrustAll
# TrustAll: TrustedHosts set to *; if not used, it’s set to empty
Set-WACWinRmOverHttps #Param: Enabled
# Enabled: $True, $False
Set-WACSoftwareUpdateMode #Param: Mode
# Mode: Automatic, Manual, Notification
Set-WACTelemetryPrivacy #Param: Mode
# Mode: Required, Optional
Set-WACOperationMode #Param: Mode
# Mode: Production, Development
Set-WACLoginMode #Param: Mode
# Mode: FormLogin, WindowsAuthentication, AadSso
Set-WACCertificateSubjectName #Param: SubjectName, Thumbprint, Target
# Target: All, FrontEnd, Service
Set-WACCertificateAcl #Param: SubjectName
Set-WACHttpsPorts #Param: WacPort, ServicePortRangeStart, ServicePortRangeEnd
Register-WACHttpSys #Param: Thumbprint, Port, UserMode
# Registers configuration of HTTP.SYS
# More info in Microsoft.WindowsAdminCenter.Configuration.psm1
Register-WACFirewallRule #Param: Port
Register-WACLocalCredSSP #Param: NoWinRmServiceRestart
Update-WACEnvironment #Param: SkipSettings, SkipDatabase, NonInteractive
# Update the Windows Admin Center environment from V1 to V2
# More info in Microsoft.WindowsAdminCenter.Migration.psm1
If we want to go beyond this customization, we have to look into PowerShell modules that were installed with WACv2 (126 cmdlets in 6 modules). We can find them in subfolders of 'C:\Program Files\WindowsAdminCenter\PowerShellModules\':
- Microsoft.WindowsAdminCenter.Configuration (104 cmdlets)
- Microsoft.WindowsAdminCenter.ConnectionTools (
Export-WACConnection; Import-WACConnection) - Microsoft.WindowsAdminCenter.ExtensionTools (7 cmdlets)
- Microsoft.WindowsAdminCenter.ManagementTools (
Enter-WACPSSession) - Microsoft.WindowsAdminCenter.Migration (11 cmdlets)
- Microsoft.WindowsAdminCenter.PowerShellTools (
Export-WACDscPackage)
Few cmdlets that we might find useful in specific scenarios:
- Get-WACProxy; Set-WACProxy
- Get-WACLoginMode; Set-WACLoginMode
- Export-WACInstallerSettings
- Test-WACService; Test-WACInstalled
- Restart-WACService
- Set-WACHAProgramFilesAccess; Update-WACHAAppSettings
- Register-WACClusterScheduledTask; Unregister-WACClusterScheduledTask
- WACHARole: New; Start; Update; Remove
- Test-WACClusterRole;
- Get-WACUpdaterScheduledTask; Stop-WACUpdaterScheduledTask
- …
What about installation on domain controller?
Express setup with self-signed certificate on domain controller Windows Server 2022:

Express setup with pre-installed certificate on domain controller Windows Server 2022:

As we can see from the animations above, express installation of WACv2 on our DC has some challenges… Few missing values and then there are also two steps were the installer actually get’s stuck at:
- Configuring WinRM over HTTPS… (Set-WACWinRmOverHttps)
- Configuring login mode… (Set-WACLoginMode)
We can unstick it with Task Manager by killing the child PowerShell process that is responsible for running the script in this particular step (we have to do it twice):

After the installation is finished, we are greeted with setup error:

If we select Yes in this final step, installer opens up Configuration.log. In this log file we can find only one error message – it’s related to Register-WACLocalCredSSP cmdlet: Failed to register CredSSP session configuration.
If we go and check Register-WACLocalCredSSP function, we’ll see that it fails because it tries to create new local group and add current user as member. Because this group is not created in local database, it can’t add current user as member. But the installer does actually create “Windows Admin Center CredSSP” group, just not locally:

Comparing steps in Configuration.log to our notes from before (same type of installation on member server), we can see that the installer skipped few steps:
Set-WACWinRmTrustedHosts -TrustAll
Set-WACWinRmOverHttps -Enable:$false
Set-WACLoginMode -Mode FormLogin
Set-WACHttpsPorts -WacPort 443 -ServicePortRangeStart 6601 -ServicePortRangeEnd 6610
Register-WACFirewallRule -Port 443
Lets try and run:
Import-Module 'C:\Program Files\WindowsAdminCenter\PowerShellModules\Microsoft.WindowsAdminCenter.Configuration'
Set-WACWinRmTrustedHosts -TrustAll
Set-WACWinRmOverHttps -Enable:$false
Set-WACLoginMode -Mode FormLogin
Set-WACHttpsPorts -WacPort 443 -ServicePortRangeStart 6601 -ServicePortRangeEnd 6610
Register-WACFirewallRule -Port 443
Restart-WACService
So, what happens if we connect to our new WAC portal? Well, it actually works 😊
We are greeted with this nice message:

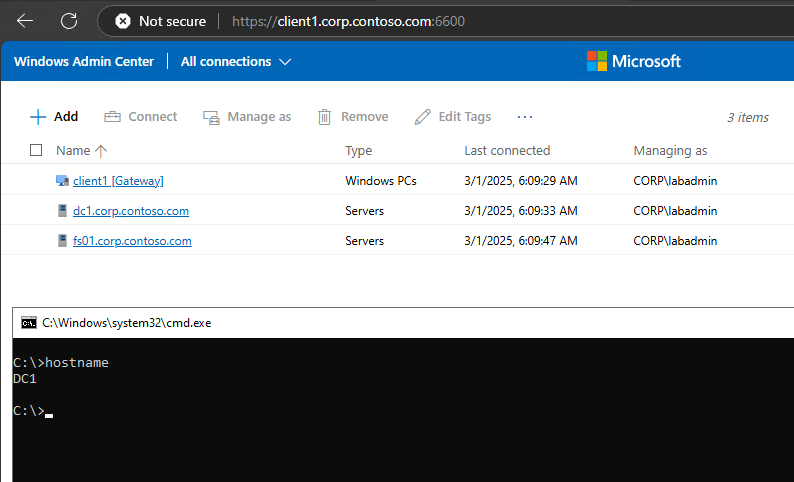
And we can connect to our servers and clients including remote access to WAC:
As far as I was able to test it, everything seems to work. At least for now.
There is one more option, we haven’t explored yet… and that is:
Custom setup with pre-installed certificate on domain controller Windows Server 2022:
We can’t see it from the animation, but all the installer options have no default value (not the case in supported installation). So when we go through custom mode wizard, we are actually setting all the missing bits that we noticed before with express mode:

At the end of the installation the installer throws the same error like with express setup:

And if we examine Configuration.log we’ll see only one error (the same like before) and this time also no missing steps.
So what happens if we now open web browser and connect to it? Well, it works 😊:
Until next time…
Features removed or no longer developed starting with Windows Server 2025
Windows Server 2025 is bringing new features and at the same time also removing some of the ones, we used to implement in our environment.
Features removed in Windows Server 2025
- IIS 6 Management Console (Web-Lgcy-Mgmt-Console)
- NTLMv1
- Wordpad
- SMTP Server
- Windows PowerShell 2.0 Engine
Features that are no longer under active development:
- Computer Browser
- Failover Clustering Cluster Sets
- L2TP and PPTP in RRAS (disabled by default, can still be enabled if necessary)
- Network Load Balancing (NLB)
- NTLM (LANMAN and NTLMv2)
- Remote Mailslots
- TLS 1.0 & TLS 1.1
- WebDAV Redirector service
- Windows Internal Database (WID)
- Windows Management Instrumentation Command line (WMIC)
- VBScript
- Windows Server Update Services (WSUS) (more info)
If we are using driver synchronization in WSUS, Microsoft announced deprecation of this feature a while ago. Currently this deprecation is planned for April 18th 2025 – drivers will be available on the Microsoft Update catalog, but we will not be able to import them into WSUS. For now WSUS deprecation does not impact existing capabilities or support for Microsoft Configuration Manager.
More information about this changes is available here.
Windows Server 2025 and System Center 2025 are GA
Windows Server 2025 has officially launched, marking a significant advancement in the Windows Server platform. This release aims to provide a secure, high-performance environment tailored to meet an array of customer requirements. With Windows Server 2025, organizations can deploy applications in various settings, including on-premises, hybrid, and cloud environments.
Enhanced Security Features
In today’s landscape where cybersecurity is paramount, Windows Server 2025 introduces a comprehensive suite of security features designed to protect both data and infrastructure. Significant security enhancements include:
- Active Directory Improvements: Active Directory, recognized for its identity and authentication capabilities, now incorporates new security features to enhance resilience against evolving threats. Improvements include updated protocols, encryption mechanisms, hardening techniques, and new cryptographic support, all aimed at increasing scalability and robustness.
- SMB Hardening: The inclusion of SMB (Server Message Block) over QUIC facilitates secure access to file shares via the internet. Additional security measures within SMB have been implemented, such as hardened firewall defaults, mechanisms to prevent brute force attacks, and defenses against man-in-the-middle, relay, and spoofing attacks.
- Delegate Managed Service Accounts: With Delegate Managed Service Accounts (dMSAs), manual password management is no longer necessary as Active Directory automates this process. This feature allows for specific permissions to be delegated for resource access within the domain, which mitigates security risks and enhances accountability through better visibility and logging of service account activities.
These advancements position Windows Server 2025 as a formidable platform for IT infrastructure, making it an imperative for organizations to commence evaluations immediately.
Hybrid Cloud Capabilities for Greater Agility
Windows Server 2025 also brings forth new hybrid cloud capabilities that significantly boost operational flexibility and connectivity. Key features include:
- Hotpatching via Azure Arc: This feature introduces a subscription service that allows on-premises customers to benefit from cloud-like advantages, such as automatic updates and minimized disruptions. Hotpatching ensures security updates can be applied with fewer reboots, catering to Azure Arc-enabled Windows Server 2025 deployments.
- Simplified Azure Arc Onboarding: Integration with Azure Arc allows organizations to leverage Azure’s functionality directly within their data centers. This seamless onboarding enhances the management of hybrid and multicloud environments, improving security and operational versatility.
- Software-Defined Networking (SDN) Multisite Features: Windows Server 2025 includes L2 and L3 connectivity options that facilitate seamless workload migration. This includes unified management of network policies to maintain consistent security and performance standards across diverse cloud environments.
These features make Windows Server 2025 a suitable choice for organizations aiming to maximize their IT infrastructures while harnessing both on-premises and cloud capabilities.
Performance and Scalability for Advanced Workloads
Tailored to accommodate demanding workloads, including AI and machine learning, Windows Server 2025 boasts several performance-oriented features:
- Enhanced Hyper-V Capabilities: The platform supports GPU partitioning and can process substantial data sets efficiently, offering a high-performance environment conducive for AI and traditional applications alike. Features such as live migration and high availability ensure operational continuity.
- Improved Storage Performance: Windows Server 2025 delivers up to 60% more storage IOPS performance compared to its predecessor. This significant enhancement in storage capabilities is particularly beneficial for applications that rely on fast data access.
- Storage Innovations: The release continues Windows Server’s legacy of supporting various storage solutions, while introducing innovative features like Native ReFS deduplication, compression, thinly provisioned Storage Spaces, and Storage Replica Compression, now available in all editions.
- Scalability in Hyper-V: With advancements inherited from Azure, Windows Server 2025 significantly increases Hyper-V virtual machine capacities, including a maximum memory configuration of 240 Terabytes and 2048 virtual processors per VM.
These developments position Windows Server 2025 as an exceptional option for organizations seeking a robust virtualization solution while also delving into AI and machine learning capabilities with high efficiency.
System Center 2025 Availability
System Center 2025 is now generally available! This release marks a significant milestone in enhancing datacenter operations, focusing on infrastructure modernization and security. Released alongside Windows Server 2025, it allows you to leverage the newest Windows Server features with integrated management tools.
Security is paramount in today’s threat landscape. System Center 2025 bolsters security with reductions in scenarios using CredSSP and NTLM, TLS 1.3 support, and enhanced data security features on Microsoft Azure. Flexible data protection strategies include virtual TPM (vTPM) support and optimizing backup processes in Hyper-V environments.
Service Provider Foundation (SPF) is discontinued, with SPF 2022 remaining compatible for a transition period. Users are encouraged to switch to Azure Arc-enabled SCVMM, enhancing virtual machine management with unified operations like start, stop, and resize, under Azure’s RBAC.
System Center Operations Manager 2025 offers full support for Windows Server 2025, embraces OpenSSL 3.1 to 3.3 for cryptographic security, and improves browser compatibility, all enhancing system management and security.
Data Protection Manager (DPM) 2025 supports Windows Server 2025, employs Azure Key Vault for passphrase storage, and ensures vTPM settings continuity in VM restorations, integrating advanced cloud security to bolster protection strategies. New in DPM 2025 is also support for protection of SharePoint Subscription Edition and virtual TPM (vTPM) support for VMware.
Virtual Machine Manager 2025 leverages Windows Server 2025, extends management to Azure Stack HCI 23H2 clusters, adopts TLS 1.3 for enhanced security, and supports latest Linux distributions, optimizing complex environments’ management.
System Center 2025 is a comprehensive upgrade addressing modern IT needs with elevated security, cloud capabilities, and user-centric innovations. It enables efficient and secure infrastructure management for both on-premises and cloud environments.
Ready to upgrade? Explore the System Center product site, try a free trial at the Evaluation Center, and learn about Windows Server 2025.
More information and download links:
- What’s new in Windows Server 2025
- Windows Server 2025 known issues and notifications
- Windows Server 2025 Security Book
- Windows Server release information
- Revolutionizing Network Management and Performance with ATC, HUD and AccelNet on Windows Server 2025
- A New Dawn of Software Defined Networking (SDN) in Windows Server 2025
- Windows Server 2025 download (ISO & VHD, 180-day trial)
- System Center 2025 download (EXE, 180-day trial)
Windows 11, version 24H2 (2024 Update)
Windows 11 24H2 is out of preview and now available as GA (General Availability) version through Windows Server Update Services (WSUS) and Windows Update for Business. We can also download it from:
- Microsoft 365 admin center (Billing -> Your products -> Volume licensing -> Products and services -> View downloads and keys),
- Visual Studio Subscriptions,
- Software Download Service (consumer editions),
- Microsoft Evaluation Center (Windows 11 Enterprise & Enterprise LTSC -> download).
Enterprise and Education editions of Windows 11 24H2 are supported for 36 months (starting on 1st of October, 2024). Home and Pro editions of Windows 11 24H2 receive 24 months of support (starting on 1st of October, 2024). Windows 11 Enterprise LTSC 2024 is supported for 5 years starting on 1st of October 2024 and Windows 11 IoT Enterprise LTSC 2024 continues to offer a 10-year support lifecycle.
Windows 11 24H2 brings a lot of security improvements and some nice-to-have features:
- Personal Data Encryption (PDE) for folders (Documents, Desktop and Pictures)
- SMB signing is now required by default for all connections,
- SMB client now supports connections over TCP, QUIC, or RDMA using alternative network ports,
- Local Administrator Password Solution (LAPS) improvements (automatically create the managed local account, randomize the name of the account,…),
- SHA-3 support,
- Checkpoint cumulative updates (update file level differentials are based on a previous cumulative update instead of the RTM release),
- Wi-Fi 7 support,
- Sudo for Windows,
- File Explorer -> Support for creating 7-zip and TAR archives,
- … (full list available at What’s new…, video overview).
Download Windows 11 24H2 and related resources:
- Download Windows 11 on Software Download Service
- Windows 11 Media Creation Tool (make a bootable USB or DVD)
- Windows 11 Disk Image (ISOs in 38 languages)
- Group Policy Settings Reference Spreadsheet (download)
- Administrative Templates (download)
- Security baseline (download)
- Windows ADK 10.1.26100.1 (released in May 2024, requires ConfigMgr 2303 or newer)
- Windows SDK 10.0.26100.1742 (downloader or ISO)
More information about the new features and security improvements in Windows 11, version 24H2 is available in official announcement: What’s new for IT pros.
Windows Server 2025 Security Baseline Preview
With Windows Server 2025 getting closer and closer to GA, Microsoft recently announced Windows Server 2025 Security Baseline Preview (beginning with build 26296 -> register as insider -> download).
With new security baseline for Windows Servers we got some major changes in security management:
- apply baselines for individual machines:
- PowerShell cmdlets (available in Microsoft.OSConfig)
- Windows Admin Center (WAC)
- apply and monitor baselines at-scale:
- Azure Policy and Azure Automanage Machine Configuration
The WAC, Azure Policy and Azure Automanage Machine Configuration experiences will be released soon to the Windows Insider Program and will only work with Windows Server 2025.
At the core of new security baseline is Microsoft.OSConfig PowerShell Desired State Configuration (DSC) module. (There is also Linux version with similar name and capabilities: Azure OSConfig.) Because we are going to be using DSC to apply security defaults, those settings that we want to enforce will be automatically protected from any drift (DSC also enables us to use declarative model for system configuration management – we define the end state and the DSC module knows how to get there.)
Current version (0.1.201) of Microsoft.OSConfig DSC module has four functions that we can use:
- Get-OSConfigMetadata
- Get-OSConfigDesiredConfiguration
- Remove-OSConfigDesiredConfiguration
- Set-OSConfigDesiredConfiguration
and three aliases (that we probably shouldn’t be using):
- osc-get
- osc-remove
- osc-set
To apply security defaults we get to choose from four baseline scenarios:
- AppControl
- Defender\Antivirus (48 settings)
- SecuredCore (3 settings -> UEFI MAT, Secure Boot, Signed Boot Chain)
- SecurityBaseline (329 settings -> Account and password policies, Credentials Protections, Protocol defaults, Security Policies and Security Options,…)
CSV files (report) with details for above scenarios are available on GitHub.
Peeking into SD subfolder of the current version of Microsoft.OSConfig DSC module reveals few more details about the supported scenarios:
- AppControl
- AppControl_AzureStackHCI_DefaultPolicy_Audit
- AppControl_AzureStackHCI_DefaultPolicy_Enforce
- AppControl_WS2025_AppBlockList_Audit
- AppControl_WS2025_AppBlockList_Enforce
- AppControl_WS2025_DefaultPolicy_Audit
- AppControl_WS2025_DefaultPolicy_Enforce
- Defender_Antivirus
- SecuredCore
- SecuredCoreState
- SecurityBaseline_AzureStackHCI
- SecurityBaseline_AzureWindowsBaseline
- SecurityBaseline_WS2025_DomainController
- SecurityBaseline_WS2025_MemberServer
- SecurityBaseline_WS2025_WorkgroupMember
After we install the prerequisites:Install-PackageProvider NuGet, PowerShellGet -Force
we can install OSConfig module:Install-Module -Name Microsoft.OSConfig -AllowPrerelease -Scope AllUsers -Repository PSGallery -Force
Get-Module -ListAvailable -Name Microsoft.OSConfig
To apply the Security Baseline via PowerShell cmdlets we have to run Set-OSConfigDesiredConfiguration (to apply new configuration, we have to restart the device):
- On domain-joined device:
Set-OSConfigDesiredConfiguration -Scenario SecurityBaseline\WS2025\MemberServer -Default - On workgroup device:
Set-OSConfigDesiredConfiguration -Scenario SecurityBaseline\WS2025\WorkgroupMember -Default - On domain controller device:
Set-OSConfigDesiredConfiguration -Scenario SecurityBaseline/WS2025/DomainController -Default - For Secured-core configuration:
Set-OSConfigDesiredConfiguration -Scenario SecuredCore -Default - For Defender Antivirus configuration:
Set-OSConfigDesiredConfiguration -Scenario Defender\Antivirus -Default
Set-OSConfigDesiredConfiguration cmdlet includes few additional nice-to-have parameters that we can use when we apply security baseline:
- Setting & Value -> custom value for specific setting
- Setting & Default -> use the default value of the setting
- Version -> apply specific version (current module has one version per scenario)
If we want to customize specific setting in the basline, we can run:Set-OSConfigDesiredConfiguration -Scenario SecurityBaseline\WS2025\MemberServer -Name AuditDetailedFileShare -Value 3
orSet-OSConfigDesiredConfiguration -Scenario SecurityBaseline\WS2025\MemberServer -Name RemoteDesktopServicesDoNotAllowDriveRedirection -Value 0
Verify custom setting:Get-OSConfigDesiredConfiguration -Scenario SecurityBaseline\WS2025\MemberServer -Name AuditDetailedFileShare
orGet-OSConfigDesiredConfiguration -Scenario SecurityBaseline\WS2025\MemberServer -Name RemoteDesktopServicesDoNotAllowDriveRedirection
To view the compliance of the applied Security Baseline we can use:Get-OSConfigDesiredConfiguration -Scenario SecuredCoreState
More info including impact and some known issues are available in the official anouncement.
Windows Server 2025 – Hotpatching and WSUS
Windows Server 2025 GA is around the corner and with it more and more features are getting finalized. To keep up with the latest we should also check the list of features removed or no longer developed starting with Windows Server 2025.
Just few days ago Microsoft announced they are planning the deprecation of Windows Server Update Services (WSUS). For now, they are going to preserve the current WSUS functionality (in Windows Server 2025) and they will also continue to publish existing and new updates through the WSUS channel.
Due to more mobile workforce and probably also due to general cloud adoption, more and more of the updating services are moving to the cloud. For client patching, Windows Autopatch has been available for a while now and it alows us to automate Windows, Microsoft 365 Apps for enterprise, Microsoft Edge, and Microsoft Teams updates from the cloud (requires Intune and Entra ID joined devices). It does require one of the cloud subscriptions for the devices but in combination with Delivery Optimization it can bring us some nice bandwidth optimizations (probably one of the core reasons for typical WSUS deployment). We can even monitor DO usage for free in Azure Monitor or directly on the device with native PowerShell commands (Get-DeliveryOptimizationStatus, Enable-DeliveryOptimizationVerboseLogs,…). If we want to get more detailed DO usage report from the same data, we can also look at a free solution like this one (based on Power BI template). To go even deeper with DO analysis, we can follow along this nice Deep Dive guide (including setup in Configuration Manager) including detailed configuration guide.
Windows Autopatch is used for client update management. If we want to manage server updates from the cloud, we do have Azure hosted solution for that – Azure Update Manager. In combination with Windows Server Hotpatch we can get some nice update management capabilities and patching optimizations that we can use with our server infrastructure.
We can use Azure Update Manager (AUM) to us help manage and govern updates for all our machines (Windows and Linux servers) in Azure, on-premises, and on other cloud platforms from a single dashboard. Some of the nice to have features of AUM are: on-demand check for updates and/or deploy security and critical updates, enable periodic assessment to check for updates, customer-defined maintenance schedules, hotpatching,… Azure Update Manager pricing page tells us that we pay per day when server is connected to Arc and managed by Azure Update Manager.
Windows Server Hotpatch has been around for a while now but it had some major limits – probably the biggest one being that it only worked on Windows Server Datacenter: Azure Edition virtual machines either on Azure or Azure Stack HCI platform. The big thing that we get with hotpatching is a monthly Windows Server update without a required reboot at the end. It works by patching the in-memory code of running processes without the need to restart the process. Just recently hotpatching got an improvement – now it works on any Azure Arc-enabled Windows Sever 2025 Datacenter and Standard.
If we look at the Azure Arc pricing, we can see that we get some of the options for free (inventory, remote management with Windows Admin Cener (WAC) including remote RDP, SSH and PowerShell,…) as soon as the agent gets connected to our Azure subscription. Some of the Azure services that can be enabled as an add-on to Azure Arc: Azure Update Manager, Azure Policy guest configuration, Azure Monitor, Microsoft Defender for Cloud etc.
If we want to test all this features before we have to deploy them in our production environments, we can use evaluation versions of the required products:
- Windows Server 2025 Preview (download)
- Windows 11 Enterprise (download)
- Microsoft 365 Business Premium Trial (comes with Entra ID P1, Intune P1,…; more info)
- Azure free account (200 USD credit)
