Archive
25th Sinergija conference in Belgrade, Serbia
During the last week of November 2025 I attended Sinergija, Southeast Europe’s premier business and technology conference. This year Sinergija had already it’s 25th anniversary and was running on November 26-27 at Belgrade’s SAVA CENTAR. The event, themed “Let’s AI!”, focused on artificial intelligence, cloud technologies, and digital transformation.
It was my pleasure to be chosen as one of the speakers. Although my presentation was in the last time slot on day two, I still had a nice big group joining me. I was presenting one of the few infrastructure related topics: Advanced usage of Azure Virtual Desktop.
If you are interested in what I was talking about, you can find my slides below.
Big thank you to the Sinergija team, speakers, partners and all the attendees that joined to make this conference a success.
30th NT CONFERENCE in Portorož, Slovenia
From 22nd until 24th of September there was a business and technology conference in Slovenia. It had a lot of great presenters sharing their experience, technical knowledge and views in many different topics. I imagine anybody that wanted to was able to find something interesting to go and learn about. Topics covered were raging from Linux to Windows, from security to development, from on-prem to the cloud, from AI and far beyond.
It was my pleasure to be chosen as one of the speakers on the 30th anniversary of the NT conference. This year I submitted three presentations and all there were confirmed for delivery:
- Je Azure Arc res lahko brezplačen? (When/how can Azure Arc be free?)
- Napredna uporaba Azure Virtual Desktop okolij (Advanced usage of Azure Virtual Desktop)
- Azure Virtual Desktop vs Windows 365
If you want to learn more about the topics covered at the conference, you can head to the https://www.ntk.si/.
If you are interested in what I was talking about, you can find my slides below.
Hope to see you next year at the 31st NT conference.

Deep dive into Windows Admin Center v2 (WACv2) installation
Few months after my last blog post on the subject of WAC, Microsoft released updated preview version of their next Windows Admin Center v2 (announcement with detailed info). That version changed some of the problematic behavior of first preview installer (for the better) and introduced new checks and steps that broke some of the scenarios from before. Later, towards the end of the year 2024, Microsoft released stable, production ready version of WACv2 – version 2410 (file name) or 2.4.0.0 (version in Control Panel and WindowsAdminCenter.exe).
Since this new version brought few nice and welcome changes, I decided to write an update to the original blog post. We will also check if and how we can get it running on DC (NOT supported or recommended for production).
Installation
Before we start with the installation of WACv2, we should check list of known issues and troubleshooting steps – just to avoid any unnecessary troubleshooting (been there, done that…).
If we want to start the installation, we need the installer files… As it was with previous version, we can find the latest version of WAC on Microsoft Evaluation Center: Windows Admin Center (download, direct download). If we want to work specifically with version 2410, we can find direct link for that version. (FYI. As of this writing, since WACv2 version 2410, Insider preview version is not the latest version of WAC anymore.)
All preview versions of WACv2 installers including now GA version 2410 of WACv2 were built with Inno Setup:

If we want to, we can customize some of the setup experience (silent, verysilent, log, saveinf, loadinf,…) with Inno Setup command line parameters (more info here):
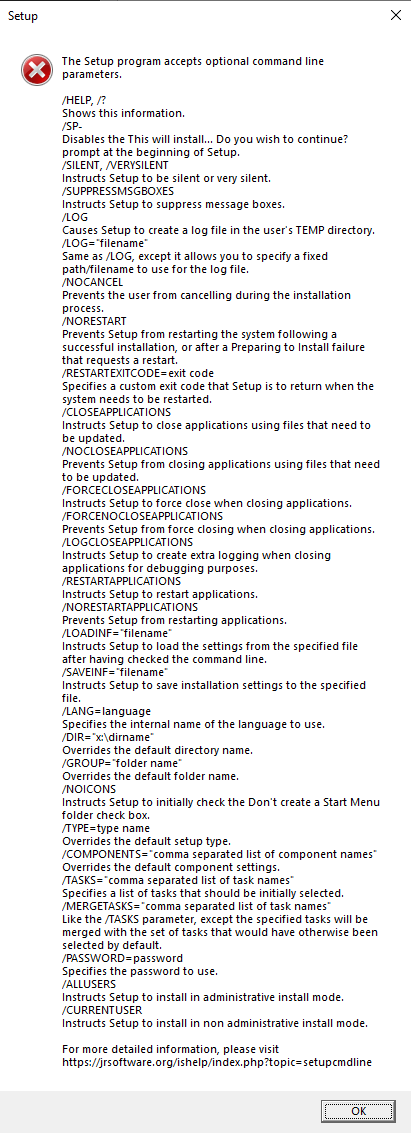
install_script.iss
If we want to see what’s hiding inside the installer, we can use tools like innoextract or UniExtract2 to get out all or some of the files. When I prefer to use GUI tools, I like InnoUnpacker – this one is nice because it’s usually able to extract setup instructions and save them in install_script.iss. And if we want to extract just the installer instructions, we can do just that as well:

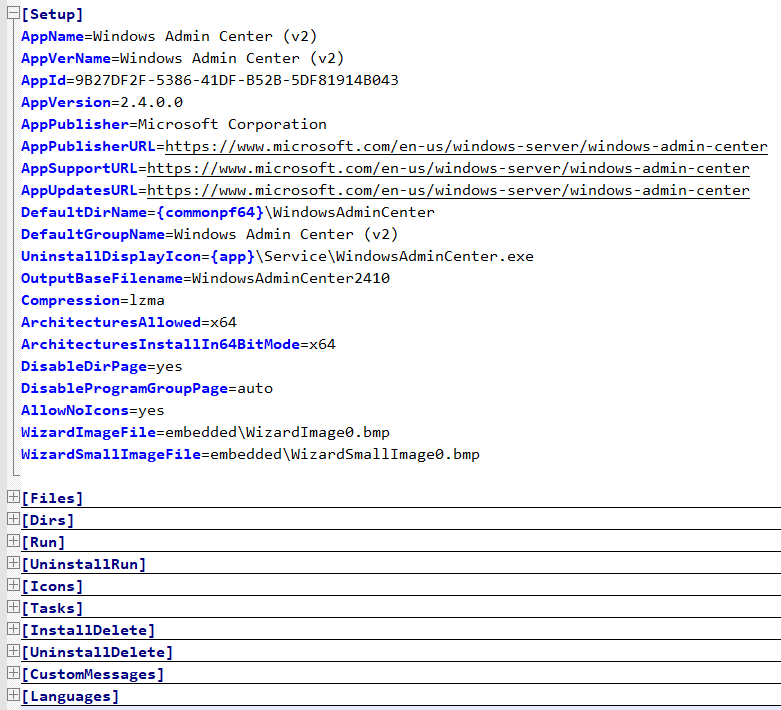
Since the install_script.iss file contains almost 7000 rows, I won’t be adding it here… But we can find it for reference in my GitHub repo for WACv2: install_script.iss. What we can see inside is general info about the package and few other sections:
For the analysis and/or troubleshooting of the setup procedure the most interesting section is “Run“, since it gives us list of all the PowerShell commands (and their locations in order of execution) that are used during the installation of WACv2 (check below for more info).
With one exception, all of the cmdlets used during the installation are stored and loaded from one module: Microsoft.WindowsAdminCenter.Configuration. Only Update-WACEnvironment is loaded from Microsoft.WindowsAdminCenter.Migration.
Installer logs
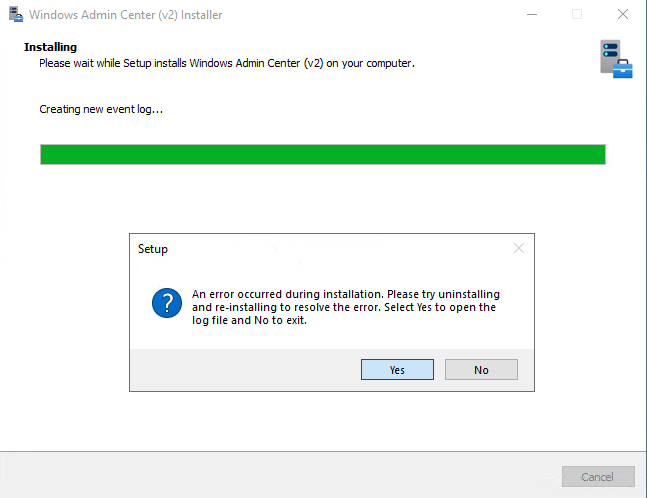
During/after the installation of WACv2 we can find verbose installation log in user’s temp folder “%temp%\Setup Log yyyy-MM-dd #00x.txt” and summary log at “C:\ProgramData\WindowsAdminCenter\Logs\Configuration.log”. If something goes wrong during the installation, installer offers us to automatically open Configuration.log log file:
When we want to keep the installer log file, we should redirect it to custom location. We can do that with setup parameter: Start-Process "C:\WAC\WindowsAdminCenter2410.exe" -wait -ArgumentList "/log=C:\WAC\WWindowsAdminCenter2410.log"
If we do the supported installation (not on our domain controller), there shouldn’t be any errors. But if there are, now we know where to look for them.
Installer options
New installer gives us two modes of installation to choose from:

Express setup, as the name implies, is simplified version with most of the background cmdlets using the default values. If we want, we can run this mode silently, which means we can also run it remotely (probably… more info below):
# silent install locally - show progress
Start-Process "C:\WAC\WindowsAdminCenter2410.exe" -wait -ArgumentList "/log=C:\WAC\WWindowsAdminCenter2410.log /silent"

# silent install locally - no GUI
Start-Process "C:\WAC\WindowsAdminCenter2410.exe" -wait -ArgumentList "/log=C:\WAC\WWindowsAdminCenter2410.log /verysilent"
TLS certificate
In both Express and Custom modes, we can either use pre-installed TLS certificate or generate new self-signed certificate with 60 days validity:

If we have custom TLS certificate available (AD CS -> Web Server template), we need to specify Thumbprint of the certificate we want to use for WAC:
In this step we can notice one really nice improvement that was introduced in one of the last preview versions: Private Key Access Control is now AutoConfigured with Set-WACCertificateAcl cmdlet. What this means is when we want to use custom certificate, all we need to do during preparation phase is install the cert in local computer store (Cert:\LocalMachine\My\).
In the TLS certificate thumbprint step we should be able to select thumbprint of our certificate in the installer’s drop-down menu. If this drop-down doesn’t show our certificate thumbprint and we know it should be there, we can manually find certificate thumbprint like this: Get-ChildItem -Path Cert:\LocalMachine\My\and just paste in in the installer.
If for some reason auto configuration for ACLs doesn’t work, we can manually run the Set-WACCertificateAcl cmdlet. In this case we need Subject Name of the certificate:
Get-ChildItem -Path Cert:\LocalMachine\My\
Set-WACCertificateAcl -SubjectName CN=FS01.corp.contoso.com
All Set-WACCertificateAcl does, it adds one new ACL for NETWORK SERVICE with Full Control to the private key of the certificate (this is what installer does for us):

If we want to do the same manually (“the old way”) we can open: CertLM.msc -> Personal -> Certificates -> select certificate -> All Tasks -> Manage Private keys -> Add -> NETWORK SERVICE -> Full control.
Express setup – Windows Server
After we accept the Eula, select the installation mode and the type of certificate we want to use, there isn’t much else we can configure in express mode. We can select how do we want WAC to be updated and how much of the diagnostic data we want to send to Microsoft.
Express setup with self-signed TLS certificate on member server Windows Server 2022:

Express setup with pre-installed TLS certificate on member server Windows Server 2022:

# Express setup configuration with self-signed certificate (server OS)
Set-WACNetworkServiceAccess
New-Item C:\ProgramData\WindowsAdminCenter\Logs\Configuration.log -ItemType File -Force
Enable-WACPSRemoting
Remove-WACSelfSignedCertificate
New-WACSelfSignedCertificate -Fqdn FS01.corp.contoso.com
Set-WACEndpointFqdn -EndpointFqdn FS01.corp.contoso.com
Copy-WACTempUpdaterProcessFiles
Register-WACUpdaterScheduledTask
Register-WACService -Automatic
Set-WACInstallDate
Set-WACFileVersion -FileVersion 2.4.0.0
Set-WACNuGetVersion -NuGetVersion 2.4.0
Set-WACWinRmTrustedHosts -TrustAll
Set-WACWinRmOverHttps -Enable:$false
Set-WACSoftwareUpdateMode -Mode Automatic
Set-WACTelemetryPrivacy -Mode Required
Set-WACOperationMode -Mode Production
Set-WACLoginMode -Mode FormLogin
Set-WACCertificateSubjectName
Set-WACCertificateAcl
Set-WACHttpsPorts -WacPort 443 -ServicePortRangeStart 6601 -ServicePortRangeEnd 6610
Register-WACAccountManagementService
Register-WACFirewallRule -Port 443
Register-WACLocalCredSSP
Set-WACServiceSecurityDescriptor
Initialize-WACDatabase
Import-WACExistingExtensions
Import-WACExistingPlugins
New-WACEventLog
Remove-WACSetupStartMenuShortcut
Start-WACLauncher

# Express setup configuration with pre-installed certificate (server OS)
# ...
Set-WACCertificateSubjectName -Thumbprint 5...6
# ...
Express setup – Windows Client
Express setup on Windows Client OS has similar experience to server installation. Most of the configuration is the same as is on the server counterpart but there are few key differences:
- WAC service is by default listening on TCP port 6600, localhost only mode
- no automatic start for WAC service
- no inbound firewall rule for WAC on TCP port 6600
Default configuration for WindowsAdminCenter service on Windows client OS:

If we enable automatic start of WAC service and add one extra firewall rule for TCP 6600, we can now run WAC in fully functional gateway mode (on Windows Client 😊):
Express setup with self-signed TLS certificate on Windows 11 looks like this:

Express setup with pre-installed TLS certificate on Windows 11 looks like this:

# Express setup configuration with self-signed certificate (client OS)
Set-WACNetworkServiceAccess
New-Item C:\ProgramData\WindowsAdminCenter\Logs\Configuration.log -ItemType File -Force
Enable-WACPSRemoting
Remove-WACSelfSignedCertificate
New-WACSelfSignedCertificate -Fqdn CLIENT1.corp.contoso.com
Set-WACEndpointFqdn -EndpointFqdn CLIENT1.corp.contoso.com
Copy-WACTempUpdaterProcessFiles
Register-WACUpdaterScheduledTask
Register-WACService
Set-WACInstallDate
Set-WACFileVersion -FileVersion 2.4.0.0
Set-WACNuGetVersion -NuGetVersion 2.4.0
Set-WACWinRmTrustedHosts -TrustAll
Set-WACWinRmOverHttps -Enable:$false
Set-WACSoftwareUpdateMode -Mode Automatic
Set-WACTelemetryPrivacy -Mode Required
Set-WACOperationMode -Mode Production
Set-WACLoginMode -Mode FormLogin
Set-WACCertificateSubjectName
Set-WACCertificateAcl
Set-WACHttpsPorts -WacPort 6600 -ServicePortRangeStart 6601 -ServicePortRangeEnd 6610
Register-WACAccountManagementService
# N/A: Register-WACFirewallRule -Port 6600
Register-WACLocalCredSSP
Set-WACServiceSecurityDescriptor
Initialize-WACDatabase
Import-WACExistingExtensions
Import-WACExistingPlugins
New-WACEventLog
Remove-WACSetupStartMenuShortcut
Start-WACLauncher

# Express setup configuration with pre-installed certificate (client OS)
# ...
Set-WACCertificateSubjectName -Thumbprint 4...D
# ...
Express setup – remote
Because WACv2 installer forcefully enables PowerShell remoting with Enable-WACPSRemoting (it runs Enable-PSRemoting -Force), any and all remote PowerShell sessions are dropped at that time. If we use PowerShell remoting to try and install WACv2, this is where the installer fails, and we must continue with manual configuration (all the steps after Enable-WACPSRemoting).
Better option is to avoid PowerShell remoting during the WACv2 installation (if already enabled, we can still use it for preparation, to create directory, copy installer files locally,..) and use something else for remote push install. I like to use Sysinternals PsExec:
# file must be already on remote computer
.\PsExec64.exe -accepteula \\$Computer -d -h -s  C:\WAC\WindowsAdminCenter2410.exe /log=C:\WAC\WWindowsAdminCenter2410.log /verysilent
# OR -> copy (overwrite) file and run the installer
.\PsExec64.exe -accepteula \\$Computer -d -h -s -c -f WindowsAdminCenter2410.exe /log=c:\Windows\Temp\WindowsAdminCenter2410.log /verysilent
.\PsExec64.exe -accepteula \\$Computer -d -h -s cmd /c del C:\Windows\WindowsAdminCenter2410.exe
Since the installer has different defaults based on the type of the operating system (check above) where it’s being installed (Server/Client), we need to be mindful about that… Luckily for us, if/when we need to, we can customize all of the defaults with few PowerShell cmdlets.
Custom setup
Custom setup has few more steps we can use to customize default configuration. Customization options for WACv2 installer in custom mode:
- Network access: Local host access only or Remote access
- Default on Server: Remote access.
- Default on Client: Localhost access only
- Login selection: HTML Form or Windows Authentication
- Default: HTML Form Login
- External HTTPS port
- Default on Server: 443
- Default on Client: 6600
- TLS Certificate: pre-installed TLS certificate or self-signed certificate
- Default: Use the pre-installed TLS certificate
- TLS Certificate thumbprint: drop-down with suitable certificates
- If empty, and proper cert is installed: manually paste the thumbprint
- FQDN: must match certificate selection
- Default: host FQDN
- Trusted Hosts: Any computer or only trusted domain computers
- Default: Allow access to any computer
- WinRM over HTTPS
- Default: WinRM over HTTP
- Automatic updates: automatically, notify or disable
- Default: Install updates automatically
- Send diagnostic data to Microsoft: Required or Required & Optional
- Default: Required diagnostic data
Custom setup with pre-installed certificate on member server Windows Server 2022:
Custom setup with pre-installed certificate on Windows 11:
In custom installation mode on Windows Client OS, we can customize WACv2 installer to deploy gateway mode with the same configuration that we saw on Windows Server OS. The installer configures both Windows Firewall with the relevant exception and WindowsAdminCenter service with Automatic startup. Job well done 😊.
End result of custom WACv2 installation on Windows 11 (fully functional gateway mode):
Custom setup – remote
Installers build with Inno setup can support automation of installer parameters by specifying custom INF file. We can generate this INF file with /SAVEINF parameter:
Start-Process "C:\WAC\WindowsAdminCenter2410.exe" -wait -ArgumentList "/log=C:\WAC\WindowsAdminCenter2410.log /SAVEINF=C:\WAC\WindowsAdminCenter2410.inf"Sadly, this does not work for custom parameters that are used in WindowsAdminCenter2410.exe installer (most of the installation wizard parameters are custom parameters). With INF config file we can only customize five install parameters. Defaults for WACv2 (WindowsAdminCenter2410.inf):
[Setup]
Lang=en
Dir=C:\Program Files\WindowsAdminCenter
Group=Windows Admin Center (v2)
NoIcons=0
Tasks=desktopshortcut
To automate custom installation of WACv2, we must run silent installer and do all the needed customization post-installation, with provided PowerShell functions (functions listed above (for default express installation) are sorted in order they are executed during the installation).
FYI. Custom parameters are supported with Inno setup installers and can be used if the author (developer) decides to implement them (as far as I can tell, this is not yet the case for WACv2 installer – maybe in next version of installer or WACv3,…).
PowerShell cmdlets we can use to manually customize WACv2
Below cmdlets are the same, as the installers is using during the installation. Listed below are just the ones we can use to customize something. Full list of installer executed cmdlets is available in the express install section.
New-WACSelfSignedCertificate #Param: Fqdn, Trust
# Trust: export self signed certificate and import it to the Trusted Root cert store
Set-WACEndpointFqdn #Param: EndpointFqdn, ServiceFqdn, NoHosts
# ServiceFqdn: default set to EndpointFqdn, if not update HOSTS
# NoHosts: used with ServiceFqdn not to write ServiceFqdn to HOSTS
Register-WACService #Param: Automatic
# Automatic: Start mode for the service; if not used, service starts On Demand
Set-WACWinRmTrustedHosts #Param: TrustAll
# TrustAll: TrustedHosts set to *; if not used, it’s set to empty
Set-WACWinRmOverHttps #Param: Enabled
# Enabled: $True, $False
Set-WACSoftwareUpdateMode #Param: Mode
# Mode: Automatic, Manual, Notification
Set-WACTelemetryPrivacy #Param: Mode
# Mode: Required, Optional
Set-WACOperationMode #Param: Mode
# Mode: Production, Development
Set-WACLoginMode #Param: Mode
# Mode: FormLogin, WindowsAuthentication, AadSso
Set-WACCertificateSubjectName #Param: SubjectName, Thumbprint, Target
# Target: All, FrontEnd, Service
Set-WACCertificateAcl #Param: SubjectName
Set-WACHttpsPorts #Param: WacPort, ServicePortRangeStart, ServicePortRangeEnd
Register-WACHttpSys #Param: Thumbprint, Port, UserMode
# Registers configuration of HTTP.SYS
# More info in Microsoft.WindowsAdminCenter.Configuration.psm1
Register-WACFirewallRule #Param: Port
Register-WACLocalCredSSP #Param: NoWinRmServiceRestart
Update-WACEnvironment #Param: SkipSettings, SkipDatabase, NonInteractive
# Update the Windows Admin Center environment from V1 to V2
# More info in Microsoft.WindowsAdminCenter.Migration.psm1
If we want to go beyond this customization, we have to look into PowerShell modules that were installed with WACv2 (126 cmdlets in 6 modules). We can find them in subfolders of 'C:\Program Files\WindowsAdminCenter\PowerShellModules\':
- Microsoft.WindowsAdminCenter.Configuration (104 cmdlets)
- Microsoft.WindowsAdminCenter.ConnectionTools (
Export-WACConnection; Import-WACConnection) - Microsoft.WindowsAdminCenter.ExtensionTools (7 cmdlets)
- Microsoft.WindowsAdminCenter.ManagementTools (
Enter-WACPSSession) - Microsoft.WindowsAdminCenter.Migration (11 cmdlets)
- Microsoft.WindowsAdminCenter.PowerShellTools (
Export-WACDscPackage)
Few cmdlets that we might find useful in specific scenarios:
- Get-WACProxy; Set-WACProxy
- Get-WACLoginMode; Set-WACLoginMode
- Export-WACInstallerSettings
- Test-WACService; Test-WACInstalled
- Restart-WACService
- Set-WACHAProgramFilesAccess; Update-WACHAAppSettings
- Register-WACClusterScheduledTask; Unregister-WACClusterScheduledTask
- WACHARole: New; Start; Update; Remove
- Test-WACClusterRole;
- Get-WACUpdaterScheduledTask; Stop-WACUpdaterScheduledTask
- …
What about installation on domain controller?
Express setup with self-signed certificate on domain controller Windows Server 2022:

Express setup with pre-installed certificate on domain controller Windows Server 2022:

As we can see from the animations above, express installation of WACv2 on our DC has some challenges… Few missing values and then there are also two steps were the installer actually get’s stuck at:
- Configuring WinRM over HTTPS… (Set-WACWinRmOverHttps)
- Configuring login mode… (Set-WACLoginMode)
We can unstick it with Task Manager by killing the child PowerShell process that is responsible for running the script in this particular step (we have to do it twice):

After the installation is finished, we are greeted with setup error:

If we select Yes in this final step, installer opens up Configuration.log. In this log file we can find only one error message – it’s related to Register-WACLocalCredSSP cmdlet: Failed to register CredSSP session configuration.
If we go and check Register-WACLocalCredSSP function, we’ll see that it fails because it tries to create new local group and add current user as member. Because this group is not created in local database, it can’t add current user as member. But the installer does actually create “Windows Admin Center CredSSP” group, just not locally:

Comparing steps in Configuration.log to our notes from before (same type of installation on member server), we can see that the installer skipped few steps:
Set-WACWinRmTrustedHosts -TrustAll
Set-WACWinRmOverHttps -Enable:$false
Set-WACLoginMode -Mode FormLogin
Set-WACHttpsPorts -WacPort 443 -ServicePortRangeStart 6601 -ServicePortRangeEnd 6610
Register-WACFirewallRule -Port 443
Lets try and run:
Import-Module 'C:\Program Files\WindowsAdminCenter\PowerShellModules\Microsoft.WindowsAdminCenter.Configuration'
Set-WACWinRmTrustedHosts -TrustAll
Set-WACWinRmOverHttps -Enable:$false
Set-WACLoginMode -Mode FormLogin
Set-WACHttpsPorts -WacPort 443 -ServicePortRangeStart 6601 -ServicePortRangeEnd 6610
Register-WACFirewallRule -Port 443
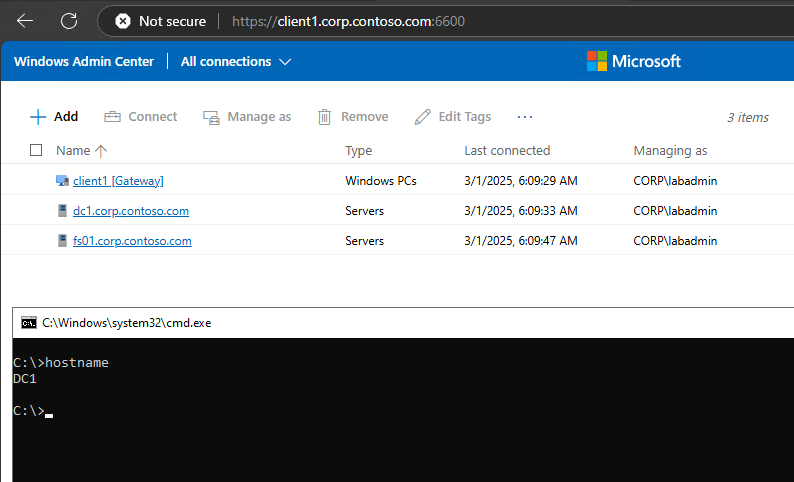
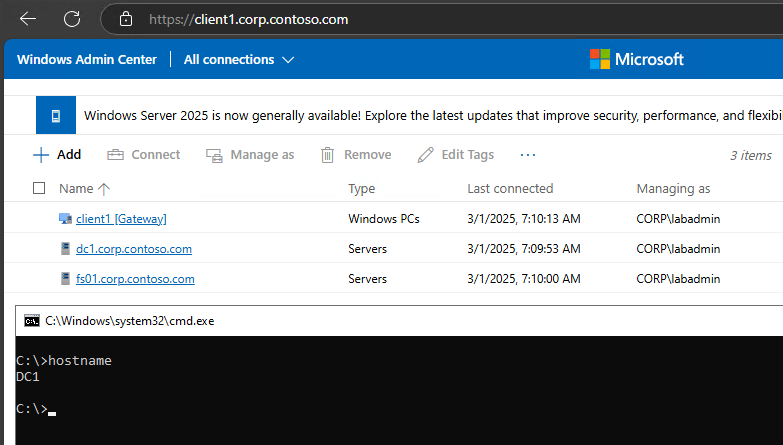
Restart-WACServiceSo, what happens if we connect to our new WAC portal? Well, it actually works 😊
We are greeted with this nice message:

And we can connect to our servers and clients including remote access to WAC:
As far as I was able to test it, everything seems to work. At least for now.
There is one more option, we haven’t explored yet… and that is:
Custom setup with pre-installed certificate on domain controller Windows Server 2022:
We can’t see it from the animation, but all the installer options have no default value (not the case in supported installation). So when we go through custom mode wizard, we are actually setting all the missing bits that we noticed before with express mode:

At the end of the installation the installer throws the same error like with express setup:

And if we examine Configuration.log we’ll see only one error (the same like before) and this time also no missing steps.
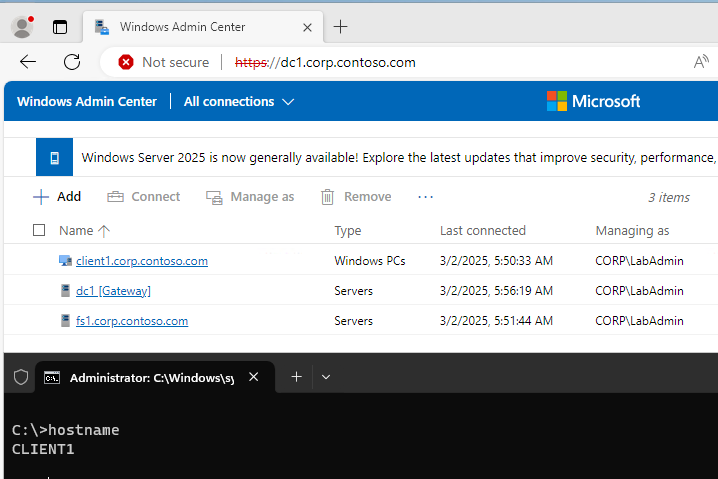
So what happens if we now open web browser and connect to it? Well, it works 😊:
Until next time…
Windows 11, version 24H2 (2024 Update)
Windows 11 24H2 is out of preview and now available as GA (General Availability) version through Windows Server Update Services (WSUS) and Windows Update for Business. We can also download it from:
- Microsoft 365 admin center (Billing -> Your products -> Volume licensing -> Products and services -> View downloads and keys),
- Visual Studio Subscriptions,
- Software Download Service (consumer editions),
- Microsoft Evaluation Center (Windows 11 Enterprise & Enterprise LTSC -> download).
Enterprise and Education editions of Windows 11 24H2 are supported for 36 months (starting on 1st of October, 2024). Home and Pro editions of Windows 11 24H2 receive 24 months of support (starting on 1st of October, 2024). Windows 11 Enterprise LTSC 2024 is supported for 5 years starting on 1st of October 2024 and Windows 11 IoT Enterprise LTSC 2024 continues to offer a 10-year support lifecycle.
Windows 11 24H2 brings a lot of security improvements and some nice-to-have features:
- Personal Data Encryption (PDE) for folders (Documents, Desktop and Pictures)
- SMB signing is now required by default for all connections,
- SMB client now supports connections over TCP, QUIC, or RDMA using alternative network ports,
- Local Administrator Password Solution (LAPS) improvements (automatically create the managed local account, randomize the name of the account,…),
- SHA-3 support,
- Checkpoint cumulative updates (update file level differentials are based on a previous cumulative update instead of the RTM release),
- Wi-Fi 7 support,
- Sudo for Windows,
- File Explorer -> Support for creating 7-zip and TAR archives,
- … (full list available at What’s new…, video overview).
Download Windows 11 24H2 and related resources:
- Download Windows 11 on Software Download Service
- Windows 11 Media Creation Tool (make a bootable USB or DVD)
- Windows 11 Disk Image (ISOs in 38 languages)
- Group Policy Settings Reference Spreadsheet (download)
- Administrative Templates (download)
- Security baseline (download)
- Windows ADK 10.1.26100.1 (released in May 2024, requires ConfigMgr 2303 or newer)
- Windows SDK 10.0.26100.1742 (downloader or ISO)
More information about the new features and security improvements in Windows 11, version 24H2 is available in official announcement: What’s new for IT pros.
Windows Server 2025 – Hotpatching and WSUS
Windows Server 2025 GA is around the corner and with it more and more features are getting finalized. To keep up with the latest we should also check the list of features removed or no longer developed starting with Windows Server 2025.
Just few days ago Microsoft announced they are planning the deprecation of Windows Server Update Services (WSUS). For now, they are going to preserve the current WSUS functionality (in Windows Server 2025) and they will also continue to publish existing and new updates through the WSUS channel.
Due to more mobile workforce and probably also due to general cloud adoption, more and more of the updating services are moving to the cloud. For client patching, Windows Autopatch has been available for a while now and it alows us to automate Windows, Microsoft 365 Apps for enterprise, Microsoft Edge, and Microsoft Teams updates from the cloud (requires Intune and Entra ID joined devices). It does require one of the cloud subscriptions for the devices but in combination with Delivery Optimization it can bring us some nice bandwidth optimizations (probably one of the core reasons for typical WSUS deployment). We can even monitor DO usage for free in Azure Monitor or directly on the device with native PowerShell commands (Get-DeliveryOptimizationStatus, Enable-DeliveryOptimizationVerboseLogs,…). If we want to get more detailed DO usage report from the same data, we can also look at a free solution like this one (based on Power BI template). To go even deeper with DO analysis, we can follow along this nice Deep Dive guide (including setup in Configuration Manager) including detailed configuration guide.
Windows Autopatch is used for client update management. If we want to manage server updates from the cloud, we do have Azure hosted solution for that – Azure Update Manager. In combination with Windows Server Hotpatch we can get some nice update management capabilities and patching optimizations that we can use with our server infrastructure.
We can use Azure Update Manager (AUM) to us help manage and govern updates for all our machines (Windows and Linux servers) in Azure, on-premises, and on other cloud platforms from a single dashboard. Some of the nice to have features of AUM are: on-demand check for updates and/or deploy security and critical updates, enable periodic assessment to check for updates, customer-defined maintenance schedules, hotpatching,… Azure Update Manager pricing page tells us that we pay per day when server is connected to Arc and managed by Azure Update Manager.
Windows Server Hotpatch has been around for a while now but it had some major limits – probably the biggest one being that it only worked on Windows Server Datacenter: Azure Edition virtual machines either on Azure or Azure Stack HCI platform. The big thing that we get with hotpatching is a monthly Windows Server update without a required reboot at the end. It works by patching the in-memory code of running processes without the need to restart the process. Just recently hotpatching got an improvement – now it works on any Azure Arc-enabled Windows Sever 2025 Datacenter and Standard.
If we look at the Azure Arc pricing, we can see that we get some of the options for free (inventory, remote management with Windows Admin Cener (WAC) including remote RDP, SSH and PowerShell,…) as soon as the agent gets connected to our Azure subscription. Some of the Azure services that can be enabled as an add-on to Azure Arc: Azure Update Manager, Azure Policy guest configuration, Azure Monitor, Microsoft Defender for Cloud etc.
If we want to test all this features before we have to deploy them in our production environments, we can use evaluation versions of the required products:
- Windows Server 2025 Preview (download)
- Windows 11 Enterprise (download)
- Microsoft 365 Business Premium Trial (comes with Entra ID P1, Intune P1,…; more info)
- Azure free account (200 USD credit)
Windows Admin Center installation – old vs new
Windows Admin Center (WAC) is a powerful tool for managing Windows Clients, Windows Servers and Windows Clusters. In December 2023, the Windows Admin Center modernized gateway (WACmg) was released to public preview through the Windows Server Insider program. This release comes as extra version to the latest generally available release of Windows Admin Center, version 2311. Some of the core differences between the old and modernized versions are:
- Old Windows Admin Center:
o Purpose: The old WAC is the modern evolution of traditional “in-box” management tools like Server Manager and MMC (Microsoft Management Console).
o Functionality: It provides control over various aspects of server infrastructure.
o Use Case: Useful for managing servers on private networks that are not connected to the Internet.
o Backend: Utilized the .NET Framework 4.6.2.
o Web Server: Used Katana components for the backend web server.
o Extensions: Supported extensions through gateway plug-ins. - Modernized Windows Admin Center:
o Purpose: The modernized WAC is an upgraded version with enhanced performance, security, and extensibility.
o Backend Upgrade: Migrated from .NET Framework 4.6.2 to .NET Core.
o Installer Flexibility: The installer now offers customization options, including network access settings, trusted hosts, and specifying a fully qualified domain name (FQDN) for the gateway machine.
o Microservice Architecture: Adopts a multi-process, micro-service based architecture. Windows Admin Center starts one process on application startup, which serves as a process manager. Subprocesses are spun up as needed for specific tasks. Gateway plug-ins also run their own subprocesses for better flexibility, scalability, and resilience.
o Kestrel Web Server: Shifted to an ASP.NET Core Kestrel web server, supporting HTTP/2 for reduced latency and improved responsiveness.
o Impact on Extensions: Gateway plug-in extensions are most impacted with the introduction of modernized gateway. If existing extensions use components written with .NET framework version 4.6.2, they will have to be updated to use the .NET Core framework. Official guidance with code samples for building compatible plugins is not yet available (more info here).
In summary, the modernized gateway brings significant improvements to Windows Admin Center, making it more efficient and adaptable for managing your server infrastructure. More information about the features and benefits of WAC modernized gateway is available here: What is the Windows Admin Center modernized gateway (preview)?
Download WAC:
– https://bit.ly/WAC-Eval (registration required)
– Direct link: https://aka.ms/wacdownload
Download WACmg:
– https://bit.ly/WACmg-Eval (Windows Server Insider registration required)
– Direct link: https://bit.ly/WACModern
WAC installation on domain controller
WAC installation on domain controller (DC) is not officially supported:

But that doesn’t mean it doesn’t work. It works nicely, just without the official support (good enough for testing in my lab environment):

If we want to install WAC on DC, we have to modify original MSI package:

To get the installation working on DC, we can drop one row with the following condition from the LaunchCondition MSI table:
Installed OR (MsiNTProductType <> 2) OR (INSTALLATION_TYPE ~= "AzureVmExtension")
or we can customize above condition to include all MsiNTProductType(s) with:
Installed OR (MsiNTProductType >= 1) OR (INSTALLATION_TYPE ~= "AzureVmExtension")
WAC installation customization
WAC was designed to be installed on desktop and/or server OS, including server core. If installation is done on desktop OS, WAC is installed in “desktop” mode:
– no remote connectivity to WAC service,
– local management of desktop OS,
– remote management of everything supported.
If installation is done on server OS, WAC is installed in “gateway” mode:
– WAC service is available for remote connectivity (ideal with Server Core as host OS),
– local management available only on server with desktop experience,
– remote management of local server and everything else.
Based on host version, setup defaults change during the installation. One good example is default port for WAC service:

During WAC installation we can customize:
– diagnostic settings (required or required+optional)
– use Microsoft Update for updates (yes or no)
– modify trusted hosts settings (yes or no)
– WinRM over HTTPS only (yes or no)
– automatically update WAC (yes or no)
– custom port (server: 443, desktop: 6516 or any)
– SSL certificate (generate with expiration 60 days or existing cert)
– HTTP port 80 redirection to HTTPS (yes or no)
If we want to change defaults, using GUI installer is easy. If we want to automate customization so that we can run installer remotely or silently, we have to go and read installation documentation. Installation parameters mentioned in the official documentation:
- RESTART_WINRM=0 -> do not restart WinRM service during installation (WinRM must be restarted for Windows Admin Center to function)
- SME_PORT=443
- SSL_CERTIFICATE_OPTION=generate
- SSL_CERTIFICATE_OPTION=installed
- SME_THUMBPRINT=<thumbprint>
One installation warning, that is useful to know:
Don’t invoke msiexec from PowerShell using dot-slash relative path notation (like, .\<WindowsAdminCenterInstallerName>.msi). That notation isn’t supported, the installation will fail. Remove the .\ prefix or specify the full path to the MSI.
If we don’t follow the official documentation and still try to run the installer using dot-slash relative path notation, below is the error that will stop the installation:

If we want to find some additional parameters, we can use to customize and automate installation, we can check official documentation for high availability deployment of WAC. There we can find link to Windows Admin Center HA Script zip file. Script is using two extra msi parameters when it finds existing WAC installation:
– REINSTALLMODE=amus
– REINSTALL=ALL
If we want to find every possible parameter that WAC MSI supports, we have to go back to MSI tables and look at Property table:

There is one property in this table: SecureCustomProperties. This one has few extra properties that could be used to customize the behaviour of the installer:
CHK_REDIRECT_PORT_80;CORS_ORIGINS;CSP_FRAME_ANCESTORS;DEV_MODE;INSTALLATION_TYPE;LEGACY_CERT;NETFRAMEWORK40FULL;PS_VERSION;REGISTRY_REDIRECT_PORT_80;SME_AUTO_UPDATE;SME_PORT;SME_TELEMETRY_PRIVACY_TYPE_INTERNAL;TOKEN_AUTHENTICATION_ENABLED;WAC_PORTAL_URI;WEBSOCKET_VALIDATION_OVERRIDE_INTERNAL;WINRM_HTTPS;WIX_DOWNGRADE_DETECTED;WIX_IS_NETFRAMEWORK_462_OR_LATER_INSTALLED;WIX_UPGRADE_DETECTED;WIXNETFX4RELEASEINSTALLED
WAC installation automation
We can find some nice PowerShell examples for automated WAC installation in MSLab scenario: Windows Admin Center and Enterprise CA:
# Desktop mode installation on Windows Client (with self-signed certificate)Start-Process msiexec.exe -Wait -ArgumentList "/i C:\WAC\WindowsAdminCenter.msi /qn /L*v C:\WAC\WindowsAdminCenter.log SME_PORT=6516 SSL_CERTIFICATE_OPTION=generate"
# Gateway mode installation (with self-signed certificate)Start-Process msiexec.exe -Wait -ArgumentList "/i C:\WAC\WindowsAdminCenter.msi /qn /L*v C:\WAC\WindowsAdminCenter.log REGISTRY_REDIRECT_PORT_80=1 SME_PORT=443 SSL_CERTIFICATE_OPTION=generate"
# Gateway mode installation (with custom certificate)Start-Process msiexec.exe -Wait -ArgumentList "/i C:\WAC\WindowsAdminCenter.msi /qn /L*v C:\WAC\WindowsAdminCenter.log REGISTRY_REDIRECT_PORT_80=1 SME_PORT=443 SSL_CERTIFICATE_OPTION=installed SME_THUMBPRINT=$Thumbprint"
WACmg installation customization
Everything we learned about WAC installation and customization is no good to us with Windows Admin Center modernized gateway (WACmg). WACmg installer doesn’t use MSI anymore – now the installer is build with Inno Setup. Installer was designed to offer more flexibility to the admin doing the installation (more info here and here):

During the installation we can choose one of the two express options (local or remote) or custom setup. Both express options will skip customization of:
– Sign-in authentication mode (FormLogin, WindowsAuthentication, or AadSso)
– Host access network names
– Internal and external network ports
– Endpoint FQDN
– Trusted hosts mode (allow access to any computer or only trusted domain computers)
– WinRM over HTTPS (HTTP or WinRM over HTTPS)
If we want to configure any of the above options, we have to select custom setup:

AadSso Sign-in authentication mode is only available with PowerShell customization post-installation.
Good to know about the installer:
- We can install a modernized gateway build of Windows Admin Center side-by-side with a legacy gateway build if we don’t choose the same ports for both installations.
- We can install WACmg in both modes (local and remote setup) on desktop and server OS.
- WACmg installation not supported on DC but works out of the box – requires some post installation customization.
- Any and all install parameters can be changed post installation with PowerShell module Microsoft.WindowsAdminCenter.Configuration (by default available in C:\Program Files\WindowsAdminCenter\PowerShellModules\Microsoft.WindowsAdminCenter.Configuration)
- Detailed installation log with all PowerShell functions executed during the installation available in %localappdata%\temp.
- New PowerShell modules with 86 functions for WAC customization:

If we want to see the details of the installation, we can check Setup Log file (“Setup Log yyyy-MM-dd #001”) available in %localappdata%\temp. We can also unpack original installer and find install_script.iss inside of the unpacked folder.
My custom (default) installation executed PowerShell functions (in order):Set-WACNetworkServiceAccess
Enable-WACPSRemoting
Remove-WACSelfSignedCertificates
New-WACSelfSignedCertificate
Copy-WACTempUpdaterProcessFiles
Register-WACUpdaterScheduledTask
Register-WACService -Automatic
Set-WACInstallDate
Set-WACFileVersion -FileVersion 2.0.1.0
Set-WACNuGetVersion -NuGetVersion 2.0.0
Set-WACWinRmTrustedHosts -TrustAll
Set-WACWinRmOverHttps -Enable:$false
Set-WACSoftwareUpdateMode -Mode Automatic
Set-WACTelemetryPrivacy -Mode Required
Set-WACLoginMode -Mode FormLogin
Set-WACSubjectName
Set-WACCertificateAcl
Set-WACHttpsPorts -WacPort 443 -ServicePortRangeStart 6601 -ServicePortRangeEnd 6610
Register-WACFirewallRule -Port 443
Register-WACLocalCredSSP
Set-WACServiceSecurityDescriptor
Initialize-WACDatabase
Import-WACExistingExtensions
Import-WACExistingPlugins
New-WACEventLog
WACmg installation automation
Because WACmg installer (WindowsAdminCenterModernizedGWPublicPreview.exe) is build with Inno Setup, we can list all supported installer parameters with:WindowsAdminCenterModernizedGWPublicPreview.exe /HELP
orWindowsAdminCenterModernizedGWPublicPreview.exe /?
To run silent installation (no interactive prompts, use setup defaults) we can run:Start-Process "C:\WAC\WindowsAdminCenterModernizedGWPublicPreview.exe" -wait -ArgumentList "/log=C:\WAC\WindowsAdminCenterModernizedGWPublicPreview.log /silent"
To run very silent installation (no interactive prompts and no progress interface, use setup defaults) we can run:Start-Process "C:\WAC\WindowsAdminCenterModernizedGWPublicPreview.exe" -wait -ArgumentList "/log=C:\WAC\WindowsAdminCenterModernizedGWPublicPreview.log /verysilent"
Setup programs build with Inno setup can support automation of installer parameters by specifying custom INF file. We can generate this INF file with /SAVEINF parameter:Start-Process "C:\WAC\WindowsAdminCenterModernizedGWPublicPreview.exe" -wait -ArgumentList "/log=C:\WAC\WindowsAdminCenterModernizedGWPublicPreview.log /SAVEINF=C:\WAC\WindowsAdminCenterModernizedGWPublicPreview.inf"
Sadly, this does not work for custom parameters that are used in WindowsAdminCenterModernizedGWPublicPreview.exe installer (most of the installation wizard parameters are custom parameters):
WACmg INF with default values:[Setup]
Lang=en
Dir=C:\Program Files\WindowsAdminCenter
Group=Windows Admin Center (v2) Preview
NoIcons=0
Tasks=desktopshortcut
Custom parameters are supported with Inno setup installers and can be used if the author (developer) decides to implement them (as far as I can tell, this is not yet the case for WACMg installer – maybe in GA version of installer)…
To automate custom installation of Windows Admin Center modernized gateway, we have to run silent installer and do all the needed customization post-installation with provided PowerShell functions (functions listed above (for default express installation) are sorted in order they are executed during the WindowsAdminCenterModernizedGWPublicPreview.exe installation).
WACmg customization
Currently the installer doesn’t configure the extension feed for the modernized gateway. Extensions not included in the Windows Admin Center installer, including external partner extensions, aren’t available unless you add an extension feed.
Default feed configuration:


Add custom feed https://aka.ms/sme-extension-catalog-feed


WACmg installation on domain controller
WACmg installation works on DC but then exits with an error. In log files we can find error message:
Register-WACLocalCredSSP: Failed to register CredSSP session configuration.
If we go and check Register-WACLocalCredSSP function, we’ll see that it fails because it tries to create new local group (which is not possible on DC):

Because this group is not created, function can’t create PS Session Configuration file and due to this failure, it can’t register new PS Session Configuration. To get this working, we can update function to use domain group or remove this part from function.
WACmg remote installation
If we try to run WACmg installation remotely (/silent or /verysilent), the installer will stop at the Register-WACLocalCredSSP function. After installer exits with an error, we can open new remote PowerShell session and manually run function Register-WACLocalCredSSP. This will drop existing PS sessions so we need to reconnect and finalize WACmg configuration with few more functions:
Set-WACServiceSecurityDescriptor
Initialize-WACDatabase
Import-WACExistingExtensions
Import-WACExistingPlugins
New-WACEventLog
Test-WACInstallationFailure 'C:\ProgramData\WindowsAdminCenter\Logs\Configuration.log'
Start-WACService
WAC and WACmg with custom certificate
If we want to use custom certificate with WAC service, we need to allow Network Service account access to private key of the certificate used. With WACmg installer we got new PowerShell function we can use to set the required permissions: Set-WACCertificateAcl
Set-WACCertificateAcl function modifies the access control list of the certificate identified by the given subject name to grant full control permissions to the Network Service account.
NTK 2019 and other Microsoft-related news
From 21. until 23. of May 2019, Portorož (Slovenia) became my home for few days. The reason for this was NTK (NT konferenca) – Microsoft’s IT conference that brought together people from all over the place.
During the three days conference was going on, I had a privilege to present three sessions of my own. As always, I was pleasantly surprised by the number of people who came to my sessions, even though the session was in the middle of the lunch time or the last one for the day. Thank you all for showing up and asking questions.
My sessions at NTK 2019 were:
- Povečanje varnosti Windows klientov – ways to improve Windows security
- Vzdrževanje SCCM in WSUS okolja – SCCM and WSUS maintenance
- Brezplačna orodja za upravljanje Windows okolij – free tools to speedup Windows maintenance
Presentations and demo files can be downloaded from NTK web site or from my OneDrive:
- Povečanje varnosti Windows klientov.pptx, Day1-Demos.zip
- Vzdrževanje SCCM in WSUS okolja.pptx, Day2-Demos.txt
- Brezplačna orodja za upravljanje Windows okolij.pptx
For all the demos on day one and day two I used Start-Demo.ps1 PowerShell script. Thank you Jeffrey Snover and Joel “Jaykul” Bennett for the original script.
During one of my presentations there was one Windows Sandbox related question – data sharing between Host and Sandbox. At the time I wasn’t aware of Windows Sandbox – Config Files which I believe is exactly where the question was going. There is MappedFolders parameter, that gives us an option to map local drive into Sandbox on user’s Desktop. Mapped folder can be Read-Only or Read&Write. Example of Windows Sandbox Config file with few additional options: WindowsSandbox.wsb
While we were busy with NTK, Microsoft rolled out few new products, services and announcements:
- Windows 10 1903 (available on VL Service Center since 21st of May, on MSDN since 4th of April)
- Microsoft Security Compliance Toolkit 1.0 updated with final version of Windows 10 Version 1903 and Windows Server Version 1903 Security Baseline (more info)
- AaronLocker updated (info)
- Features in Configuration Manager technical preview version 1905 (Application groups, BitLocker management, Task sequence debugger,…)
- Microsoft Edge preview builds – Chromium-based (Beta, Dev and Canary)
- Application Guard for Chrome und Firefox
On-premises BitLocker management using System Center Configuration Manager
Beginning in June 2019, System Center Configuration Manager (SCCM) will release a product preview for BitLocker management capabilities, followed by general availability later in 2019.
Configuration Manager will support BitLocker for Windows 10 Pro, Windows 10 Enterprise, and Windows 10 Education editions. It will also support Windows 7, Windows 8, and Windows 8.1 during their respective support lifecycles.
SCCM will provide the following BitLocker management capabilities:
Provisioning
Our provisioning solution will ensure that BitLocker will be a seamless experience within the SCCM console while also retaining the breadth of MBAM.
Prepare Trusted Platform Module (TPM)
Admins can open the TPM management console for TPM versions 1.2 and 2.0. Additionally, SCCM will support TPM+PIN for log in. For those devices without a TPM, we also permit USBs to be used as authenticators on boot.
Setting BitLocker Configuration
All MBAM configuration specific values that you set will be available through the SCCM console, including: choose drive encryption and cipher strength, configure user exemption policy, fixed data drive encryption settings, and more.
Encryption
Encryption allows admins to determine the algorithms with which to encrypt the device, the disks that are targeted for encryption, and the baselines users must provide in order to gain access to the disks.
Policy enactment / remediation on device
Admins can force users to get compliant with new security policies before being able to access the device.
New user can set a pin / password on TPM & non-TPM devices
Admins can customize their organization’s security profile on a per device basis.
Auto unlock
Policies to specify whether to unlock only an OS drive, or all attached drives, when a user unlocks the OS drive.
Helpdesk portal with auditing
A helpdesk portal allows other personas in the organization outside of the SCCM admin to provide help with key recovery, including key rotation and other MBAM-related support cases that may arise.
Key rotation
Key rotation allows admins to use a single-use key for unlocking a BitLocker encrypted device. Once this key is used, a new key will be generated for the device and stored securely on-premises.
Compliance reporting
SCCM reporting will include all reports currently found on MBAM in the SCCM console. This includes key details like encryption status per volume, per device, the primary user of the device, compliance status, reasons for non-compliance, etc.
If you are familiar with Microsoft BitLocker Administration and Monitoring (MBAM), you probably noticed that above listed BitLocker-related SCCM improvements to come look a lot like MBAM features – and you would be correct to think that. The reason for that is in Microsoft’s announcement for the MBAM support – MBAM will end mainstream support on July 9, 2019 and will enter extended support until July 9, 2024.
Regardless of the MBAM situation, I sure am happy to see this new feature set is coming to SCCM.
More info at: Microsoft expands BitLocker management capabilities for the enterprise
AaronLocker – automate AppLocker configuration
AppLocker is application whitelisting security feature that became available in Windows 7 and Windows Server 2008 R2. With Windows 10 and Windows Server 2016 Microsoft decided to rebrand it to Windows Defender Application Control or WDAC for short. Other than rebranding it, AppLocker didn’t receive any major improvements. In most of the management tools you will still find it under AppLocker name.
If you want to learn more about it, I would recommend you to check out official documentation.
If you or your company is using Windows Enterprise or Education client operating system, then you should look at setting up AppLocker. The implementation itself doesn’t take much time but it can drastically improve overall security of Windows environment. In Windows 10 and Windows Server 2016 AppLocker represents one part of multi-layer defense strategy.
To ease the implementation, Aaron Margosis put together set of PowerShell scripts including detailed documentation called AaronLocker. What AaronLocker helps you do is automate most of the tasks needed to implement and maintain AppLocker.
Few of the nice to have features are:
– Selective scan of any folder and subfolders with rule merge
– Additional rules for domain-joined PCs
– Find user writable paths and set exclusions
– Exclude sensitive build-in Windows programs, that are rarely used by non-admins
– Policy report in Excel
– Audit and Enforce policy
– Audit/Enforce summary reporting from AppLocker Logs in Event Viewer
– Reporting supports forwarded events with Event Forwarding (How-to in the documentation)
– Detailed documentation including how to implement Pilot / Broad / Production phases
You can learn more about AaronLocker from the documentation available on the GitHub portal. If you prefer or like video content, you can also check two YouTube videos, first one introducing the solution and second one quick start.
SloWUG – 2019.02 – Pohitrimo nadzor Windows okolja s SCCM
On 13th of February I was presenting at Slovenian Windows Users Group (SloWUG) in Ljubljana. We looked at different SCCM features, some fully released, some in preview in latest stable build (1810) and some in preview in preview builds. Focus of the presentation was on the features administrators can use, to decrease time of their daily work and at the same time improve existing procedures.
Attached to this post you can find link to my presentation.
After short discussion with attendees, I plan to do another SCCM-related presentation, this time focusing on SCCM maintenance and WSUS.
