Archive
Windows Server 2025 (26080) – ADPrep error 0x800b010a
There is always something new we can learn by doing things we haven’t done before. And sometimes this will bring back old memories…
Recently I started testing latest preview of Windows Server 2025 (build 26080) and I managed to stumble upon on old (looks like still relevant) problem, that I had to deal with years ago.
Before introducing new version of Windows Server as a Domain Controller (DC) (this is not required when new server becomes member server and not a domain controller) into existing environment, it’s recommended to prepare that environment with the execution of ADPrep tool (found in .\support\adprep folder on the installation media that matches the version of the server we are adding as new domain controller). As mentioned, it’s recommended and not required – if admin account doing the promotion of new server to a DC role has sufficient privileges (usually membership in Schema Admins and Enterprise Admins is sufficient), this can be done automatically (forestprep and domainprep) just by using Server Manager and adding required role with the build-in wizard:

The same would also apply when using PowerShell to promote existing member server to a DC (if admin account doing the promotion has sufficient privileges, forestprep and domainprep is automatically executed when/if needed) :
Install-WindowsFeature -name AD-Domain-Services -IncludeManagementTools
Test-ADDSForestInstallation -DomainName corp.contoso.com -InstallDns
Install-ADDSForest -DomainName corp.contoso.com -InstallDNS
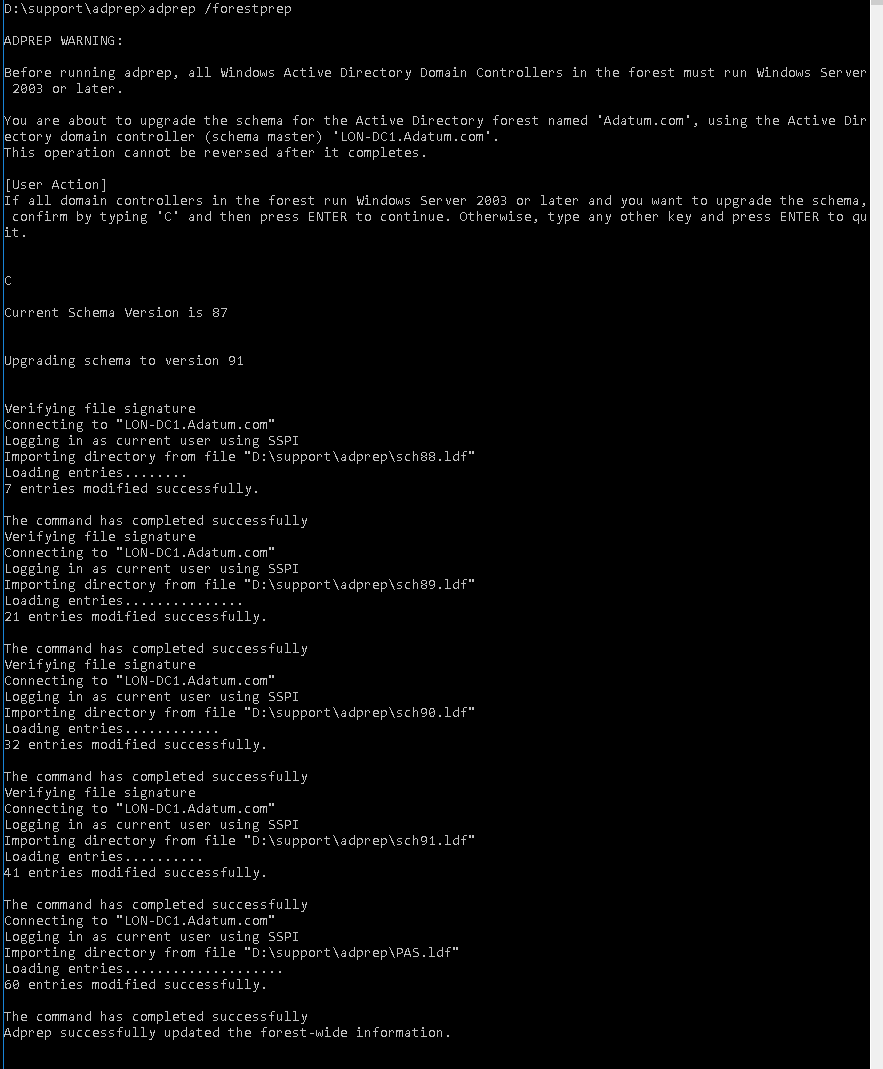
Before upgrading one of the existing domain controllers (when doing in-place upgrade to a new version of Windows Server), it’s mandatory to run the ADPrep tool. Per documentation:
– For an in-place upgrade of an existing DC, you must run adprep /forestprep and adprep /domainprep manually.
– You need to run Adprep /forestprep only once in the forest for each newer version of Windows Server.
– Run Adprep /domainprep once in each domain in which you have DCs that you’re upgrading for each newer version of Windows Server.
When I tried to run adprep /forestprep on one of my existing domain controllers, I got stopped with an interesting error: Failed to verify file signature: error 0x800b010a.

As it happens, I’ve seen this error years ago and the solution still works…
The problem is with the digital signature on the schupgrade.cat file next to adprep.exe tool. The root certificate used to sign this file is not trusted and because of that ADPrep fails to do its thing.

Solution is simple – just check the digital signature of the file and install the root cert into local “Trusted Root Certification Authorities” store. After that is done, ADPrep should work as expected:

It might happen that you don’t see the “Microsoft Development Root Certificate Authority 2014” certificate in the certificate path (for me this happened on server 2016 DC, that was at the time not connected to the internet):
If that happens to you too, you can save below string as CER file and import it as usual:
-----BEGIN CERTIFICATE-----
MIIGBTCCA+2gAwIBAgIQB48KnQPfEZ5DTk/sG/AjWjANBgkqhkiG9w0BAQsFADCB
lDELMAkGA1UEBhMCVVMxEzARBgNVBAgTCldhc2hpbmd0b24xEDAOBgNVBAcTB1Jl
ZG1vbmQxHjAcBgNVBAoTFU1pY3Jvc29mdCBDb3Jwb3JhdGlvbjE+MDwGA1UEAxM1
TWljcm9zb2Z0IERldmVsb3BtZW50IFJvb3QgQ2VydGlmaWNhdGUgQXV0aG9yaXR5
IDIwMTQwHhcNMTQwNTI4MTY0MzQ2WhcNMzkwNTI4MTY1MTQ4WjCBlDELMAkGA1UE
BhMCVVMxEzARBgNVBAgTCldhc2hpbmd0b24xEDAOBgNVBAcTB1JlZG1vbmQxHjAc
BgNVBAoTFU1pY3Jvc29mdCBDb3Jwb3JhdGlvbjE+MDwGA1UEAxM1TWljcm9zb2Z0
IERldmVsb3BtZW50IFJvb3QgQ2VydGlmaWNhdGUgQXV0aG9yaXR5IDIwMTQwggIi
MA0GCSqGSIb3DQEBAQUAA4ICDwAwggIKAoICAQDCD39tSbs58E2UP+j7TcXrO+Eo
WrmJKkZ+pcMzJx2CiT/rM6GHaurogrnaw5130TXAy4M2cqZXGRK8FeLIPHuDYjQU
1au23jaLoVpxplGWpwYzsyIdFGJTwqWvmkDKvixIVJnnKpNop2kZC5lpO8GyrK6U
3F+rfgLK3jyndKaMEKDlrracNe+DixDllyq6kWuaakWV2dBUcY5lP8SKU8oeOEcK
6dBBhKXaHmYBZQTmUFt3NfW0LikyDMa/X2HuMiC3fDn5Efr/YF7+xmn0bx4d7R0G
52UemhEuY0QGXzFDFzPpoyaC1EuDEk/SoSYDJUjhOr2E9YrVtG4a6HEgDkVTAWet
4x5r6LLkq/31O466Z69ZhMxcddCdqlxyxCY2oqwyTGqx+DMXRNKnfXDu63CUmrzq
uhwQS2NbON3SJUUEsvCzWnwLCo4hQGQ3EU2WaUUz5JODnvmztRwrBXHqbcznSLa2
3oBQEMpJOLNZBXBOvZ6IAiJYZInrQNqxLS1qQIhdI8M+0PXVt5CKKFQ5YqLFxrG/
dM2GlflFa8zyB+qsXNM296J6tbRyUyoGPsM3lFhYsUpxu1zNnLKvEJrZQzY+UoUZ
50IokRGMjOe73+bIVQhzdfOWDYa30uUGssCKVKhhdyB9bNH+umjzRUqvEYTrhn0v
BPNU6iD/1ds9JQJwhwIDAQABo1EwTzALBgNVHQ8EBAMCAYYwDwYDVR0TAQH/BAUw
AwEB/zAdBgNVHQ4EFgQUhXAAn3dZHoysPJ93JigZzJrBjzIwEAYJKwYBBAGCNxUB
BAMCAQAwDQYJKoZIhvcNAQELBQADggIBAE8ldL0fYk9fD/dCItfR1lMEIy7F1dcH
K2t5O19tkO0TVdOC8fUCjz75liZ+DUIYdvxgVYJahr0RMzlpD87gsCvxXRnf2NL6
hqTMzazw0K6aiyskjwPBNQ0gs9/HQup3KS4KEvwLGkWN2TGEDY0CwKz60hK/Hmo0
PuqDAKNIdU5yZi2hpRKfN6hdSndZz9Y6/DDFpgmlv7EI4/ssn3bE+05hHW0j83Zp
hetJuw33PdCqBbzdPW6ARF7ZmmjsyYnH5hoY+GCg54z25lFvDuAluGP5+cILjDyc
svBCzb7D9f5JKVWcXoaW+6HtbSaG6Lggi1zG5y0xxarKfUt9oFmkHvtQcemvz9aq
DZnejpUmlzGl9H9t9GgVuOP3rdjv0Th1Al/9bU78tvwvRRupytEeev91GBU2wSDk
X0g6let75PX29P7JSyGiqeqKmSXL6ERAkNU5tGsjm1K8wMF+F2ZuZQv1dBWWqGbt
hWhUsiTodYhkRYmFPHpla5bg8lnqRyVmD2obDD/USuZLJhdHCf7U17jgzucvlK2A
i2dwzLd7zxsrudFbvbgDXLHwG0Es5lNVFudKDkEImTfiqddtDmpF5ezjiKn9tpvD
KCDOq8KTa1FlU7+gXnudJjSaUUyMpjjVhls8Ve5Q7AALyqzcyhCr3xib0qwMjQhF
Fa+FNTVa5Sa8
-----END CERTIFICATE-----
Above certificate is base-64 encoded CER file for the “Microsoft Development Root Certificate Authority 2014”.
Decrypting SID-protected PFX Files Without Having a Password
Recently I started following new blog available at CQURE Academy. Since it’s part of CQURE, I guess most of blog posts will be security related. So far most of the content was contributed by Paula Januszkiewicz. For those of you who haven’t heard her name before, you can check her bio at Paula Januszkiewicz.
Her latest blog is “Decrypting SID-protected PFX Files Without Having a Password“.
If you work with Active Directory and Certificate Services or just simply use PFX files and you want to know more about the implementation of SID-protected PFX files in recent versions of Windows, than this is definitely a must read for you.
One simple tip she points out is how to retrieve password of SID-protected PFX file if you are on the “allow list” (there is always a random password being used and it can be seen during the PFX import phase). You can save this password in your secure password database and use it “in case of…”.
More importantly, she is demonstrating how to inspect SID-protected PFX files and how to decrypt them without being on the “allow list”.
To demonstrate this, she is using two tools, created by CQURE:
– CQMasterKeyAD (retrieve master key from AD)
– CQDPAPINGPFXDecrypter (get decrypted password from PFX with known master key)
For the inspection of the PFX file she uses ASN.1 Editor, written by Vadims Podāns (author of the PowerShell PKI Module).
She plans to show more details about this at Microsoft Ignite. If you’ll be there, be sure to attend her sessions. For those of us, not so lucky, we’ll have to wait for session recordings at Channel 9.
From AdmPwd to LAPS and now LAPS.E
How it all began…
Not many Windows admins heard about AdmPwd in the early 2012. I guess one of the reasons was, that we were all still trusting in the secure storage of passwords that were used as part of Group Policy Preferences (GPP) configuration. As probably many of you, I used GPP for setting and resetting passwords for local users on domain-joined Windows systems. Although not that often, I also used GPP for GPO-based management of Scheduled Tasks (which also supported usage of account names and passwords).
Until 2012 I believed that passwords used in GPP-based GPOs were safe since they were encrypted with AES-265. And then it happened – one day somebody decided to publish 32-byte AES key which was used for password encryption in GPP. Some time after that internet became full of tips and tricks on how to find and decrypt passwords stored in SYSVOL (like this one). More than two years later Microsoft released security update that blocked usage of passwords in the affected GPPs (Drive Maps, Local Users and Groups, Scheduled Tasks, Services, Data Sources).
Soon after Microsoft released security update, Microsoft PFE Tom Ausburne wrote blog post How To Automate Changing The Local Administrator Password. He explained part of the story and, more importantly, presented a solution for something a lot of admins were struggling with – how to manage local admin password in this new world without GPPs. The answer was AdmPwd.
AdmPwd
Until I read his blog post I didn’t really know much about AdmPwd – although the product and it’s code was already freely available on the internet for more than two years.
As it happens, around the same time as Tom published his blog post, I started working on a project that had high security requirements and one of them was automated management of local admin passwords. With few different options on the table, AdmPwd was chosen as the final solution for this particular requirement.
Some other tools and resources that were also used for securing this particular environment:
– Microsoft Enhanced Mitigation Experience Toolkit (EMET)
– Microsoft Security Compliance Manager (SCM) and it’s LocalGPO Tool (LGT)
– SANS SEC505 course scripts
As luck would have it, Jiri Formacek, developer of AdmPwd, also joined the same project. After few late evening beers and chats with him I got even more interested in AdmPwd. Although I wasn’t responsible for the implementation of AdmPwd, it got me intrigued and I started investing my “free” time into testing and learning about this new tool. I also added his website Local admin password management solution into my “good to know” collection.
LAPS and LAPS.E
With regular updates/improvements and published blog, AdmPwd started gaining wider audience and more acceptance in the enterprise environment. Approximately one year later, AdmPwd became Local Administrator Password Solution (LAPS) and MS made it part of it’s product portfolio (published in Microsoft Download Center and as MS Security Advisory 3062591).
Few months later in 2015, advanced version of LAPS was released – LAPS.E (also known as LAPS-E or LAPS/E). For the last few months, LAPS.E is at version 7.2.1.0 and is not yet included in MS product portfolio. Regardless of this, based on my experience, new LAPS.E is stable and working solution that is by now probably deployed in quite a few enterprise environments.
Important changes between versions
I won’t go deep into details about all the changes between different versions of this solution. If you want to know more about changes between versions and what they bring to the table, I would recommend you to start with reading Description at Local admin password management solution.
If you want to know all the details about the solution, please read technical specification document, available as part of documentation package of the version you are interested in.
What I’ll focus on are three different versions that you can currently download and start testing.
All versions:
– packaged as MSI installers
– default installation installs only client DLL (Client Side Group Policy Extension)
– dedicated installers for x86 and amd64
– GPO management with custom ADMX/ADML
– PowerShell module for management is AdmPwd.PS
– GUI for management
– require Windows 2003 SP1 and newer DCs
– require AD Schema extension
– require delegation of permissions on computer accounts
– supports only domain joined Windows clients
– support local and AD auditing
– client settings located in registry at HKLM\Software\Policies\Microsoft Services\AdmPwd
AdmPwd 5.2.0.0
– AdmPwd @GitHub
– x64 Installer
– x86 Installer
– supports Windows XP/2003 and above
– installation folder for CSE and client tools is %ProgramFiles%\AdmPwd
LAPS 6.2.0.0
– Documentation and Installers
– supports RODC (CSE and admin tools) – solution requires connection to a writable DC
– supports Windows Vista and above, and Windows Server 2003 and above
– updated GUI, PowerShell module and ADMX/ADML files
– same AD Schema as in previous versions
– installation folder for CSE and client tools is %ProgramFiles%\LAPS
AdmPwd.E 7.5.x.x
– AdmPwd.E @GitHub
– samples for development of custom AdmPwd.E support tools and client applications
– Sway-hosted solution overview
– updated AD Schema, GUI, PowerShell module and ADMX/AMDL files
– supports multi-forest deployment
– supports password encryption
– supports password history
– encryption key managed with GPO
– supports Windows XP/2003 and above (until v7.5.1.0; v7.5.2.0 removed support)
– new password decryption service – PDS (on DC or member server; multiple instances for HA)
– management with client tools is done through PDS and not directly on AD objects
– installation folder for CSE and client tools is %ProgramFiles%\AdmPwd
LAPS.Nano.DSC
– LAPS and Nano Server
– Testing LAPS for Nano Server with ws2016lab
– tested on TP5 of Nano server
– only works on Nano server
– instead of CSE it works as a Windows Service
– requires PowerShell DSC to configure settings in registry
– since version 7.5.1.0 client for Windows 2016 Nano server part of AdmPwd.E
Lessons learned
I started working with AdmPwd when it was at version 4.0.7.0. Since then it got quite far already but it’s still going to go further – and I’m going to follow :).
To ease your first or next step with this solution, I wanted to share few tips I learned along the way. To be honest, this is actually the reason why I wanted to write this post for quite some time. Well, this and some encouraging feedback after I posted my last two posts two weeks ago (after 4 years before that).
Clean install
- Please, do read technical documentation before you start. You can find some nice examples and a lot of explanation on the “how it works” side of things.
- Learn about the solution and test it in non-production environment first.
- Define permission model that supports your organization.
- Define password policy for local admin account.
- Run AD health check.
- Install and use PowerShell module to extend AD Schema (as member of Schema Admins; whoami /groups).
- If deploying PDS server, define location and HA requirements.
- Install and configure PDS server (port, firewall exception, custom service account).
- Delegate needed AD OU permissions.
- Copy ADMX & ADML to Policies, preferably in Central Store.
- Implement new GPO with needed configuration (easier for future upgrade).
- Install CSE on clients.
- Install GUI and/or PowerShell module on management computer.
Upgrade
- Schema update needed when upgrading to version 7 (versions 4, 5 and 6 share the same AD Schema extensions).
- New versions of management tools are backward compatible.
- Upgrade management tools and ADMX/ADML files.
- If you want to support multiple versions with different settings, use dedicated GPOs.
- Prepare new GPOs or set new policies in existing GPOs.
- Only one CSE version can be installed on any client at one time.
- Deploy new CSE to clients.
Custom install
– Different versions of PowerShell modules and GUI can be deployed on the same management computer in “portable mode” (without installation) as long as they are in different folders.
– Management tools can be stored and run from central location.
– To create “portable” versions of management tools, use admin install for MSI packages:
MSIEXEC /a “LAPS.x64.msi” /qn TARGETDIR=”AdmPwd.Setup.x64″
– To hide software in Programs and Features Control panel view, use msiexec parameter ARPSYSTEMCOMPONENT=1:
MSIEXEC /i “LAPS.x64.msi” /qn ARPSYSTEMCOMPONENT=1
– To create custom local admin account use msiexec with CUSTOMADMINNAME parameter:
MSIEXEC /i “LAPS.x64.msi” /qn CUSTOMADMINNAME=LocalAdmin
– To change default behavior of component installation (CSE only), you can either customize MSI with MST or use msiexec with ADDLOCAL parameter:
msiexec /i LAPS.x64.msi ADDLOCAL=CSE (this is default configuration)
msiexec /i LAPS.x64.msi /qn ADDLOCAL=CSE (silent install, no GUI, default configuration)
msiexec /i LAPS.x64.msi /qn ADDLOCAL=CSE,Management,Management.UI,Management.PS,Management.ADMX (silent install of CSE and all management tools)
msiexec /i LAPS.x64.msi /qn ADDLOCAL=Management,Management.UI,Management.PS,Management.ADMX REMOVE=CSE
or
msiexec /i LAPS.x64.msi /qn ADDLOCAL=Management.UI,Management.PS,Management.ADMX REMOVE=CSE (silent install of all management tools, remove CSE)
msiexec /i LAPS.x64.msi /qn ADDLOCAL=CSE,Service (silent install of PDS and CSE)
msiexec /i LAPS.x64.msi /qn ADDLOCAL=Management (silent install, prestage only – no component gets installed) GUI-based selection would be like this:
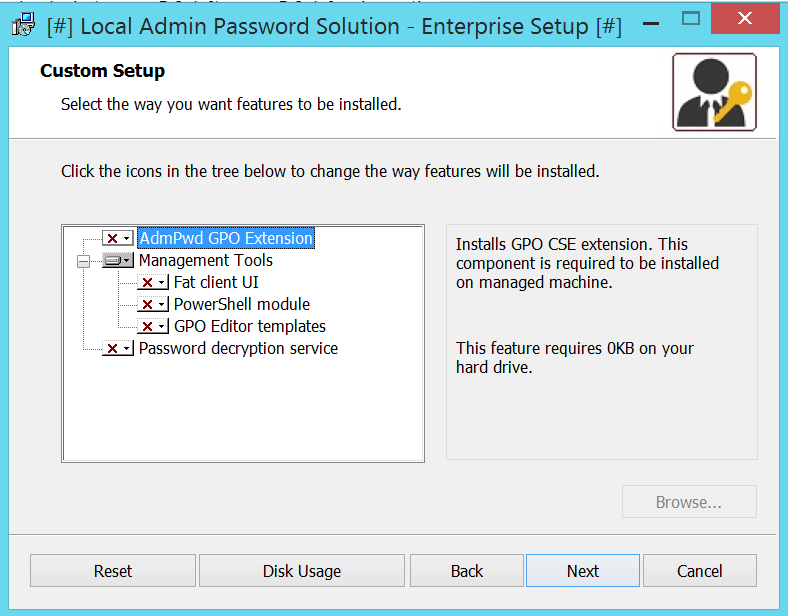
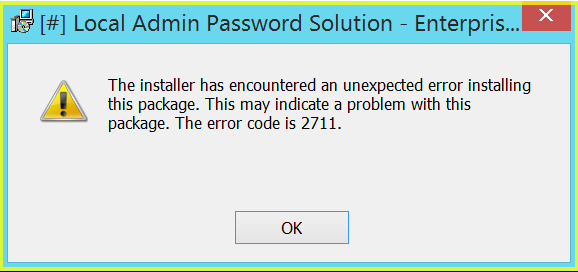
If you want to check which components are available for ADDLOCAL parameter, use Orca, SuperOrca or any other MSI database table editor and view table Feature. Be aware, that this parameter is case sensitive. If you miss-type something, you’ll get error code 2711 during installation:
Components, supported with LAPS 7 installer:
– CSE
– Management.UI
– Management.PS
– Management.ADMX
– Service
If you want to learn more about MSIEXEC and supported parameters check:
– Command-Line Options
– How to Use Property Reference Command-Line Parameters with Msiexec.exe
Despite the unusually long post, I hope you managed to get something useful out of if. If nothing else, it’s a nice reference for future reading – another reason why I wanted to write about it.
Stay tuned for the next one…
* links updated on 10th of April, 2017 to include GitHub sources
